Convert a Physical Windows 7 Computer to a Hyper-V Virtual Machine
This procedure converts an existing physical Windows 7 installation into a Hyper-V virtual machine using Microsoft Sysinternals Disk2vhd.
How to P2V a Windows XP machine, disable SATA boot drivers and enable IDE boot drivers – Ernie Costa
Disk2vhd - Sysinternals | Microsoft Learn
Convert Win 7 physical to virtual in Hyper-V | IT by Mitch
How to convert physical machines to virtual - Disk2VHD
Use this process mainly for recovering data or retaining access to legacy software. Windows 7 is unsupported and should not be used as a normal internet-connected production system.此流程主要用于恢复数据或保留对旧版软件的访问权限。Windows 7 不受支持,不应将其用作连接互联网的常规生产系统。
Important Precautions重要注意事项
Before making any changes:在进行任何更改之前:
- Create a complete image of the original physical disk.创建原始物理磁盘的完整映像。(using diskgenius or pe to make a full disk clone)
- Keep the original disk disconnected after the image has been created.镜像创建完成后,请保持原磁盘断开连接。
- Create at least two copies:至少创建两份副本:
- Original untouched disk image原始未修改的磁盘映像
- Working VHD copy
- Perform all repair work on the working copy.所有修复工作均在工作副本上进行。
- Do not run
CHKDSK, Startup Repair, or registry changes against the original disk.不要对原始磁盘运行CHKDSK、启动修复或注册表更改。 - Keep the VM network adapter disconnected during the initial boot.首次启动时,请保持虚拟机网络适配器断开连接。
Step 1: Connect the Physical Disk步骤 1:连接物理磁盘
Shut down the original Windows 7 computer and remove its disk.关闭原有的 Windows 7 电脑并取出其硬盘。
Connect the disk to the Hyper-V host using one of the following:
- Internal SATA connection内部 SATA 连接
- USB-to-SATA adapterUSB 转 SATA 适配器
- SATA docking stationSATA 扩展坞
When Windows detects the disk:当 Windows 检测到磁盘时:
- Do not initialize it.不要初始化它。
- Do not format it.不要格式化。
- Do not run Scan and Repair.不要运行扫描和修复程序。
- Do not run
CHKDSK.不要运行CHKDSK。
Step 2: Create the Virtual Disk步骤 2:创建虚拟磁盘
Download and run Microsoft Sysinternals Disk2vhd as Administrator.以管理员身份下载并运行 Microsoft Sysinternals Disk2vhd。
Select all partitions required by Windows 7, including:选择 Windows 7 所需的所有分区,包括:
- System Reserved partition系统保留分区
- Windows partitionWindows 分区
- Any boot-related partition任何与启动相关的分区
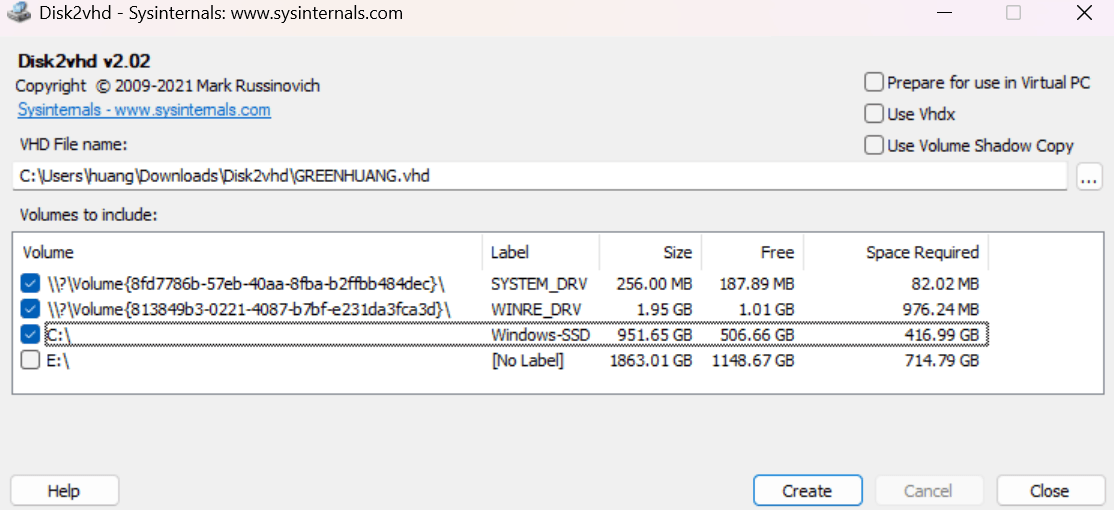 Recommended options:推荐选项:
- Enable
Use Vhdwhere possible. (Windows 7 cannot natively boot from a VHDX file. The VHDX format was introduced in Windows 8 and is only supported natively on Windows 8, 8.1, and Windows 10. Windows 7 无法直接从 VHDX 文件启动 VHDX 格式是在 Windows 8 中引入的,并且仅在 Windows 8、8.1 和 Windows 10 上得到原生支持。) - Enable
Use Volume Shadow Copywhen converting a running Windows installation.转换正在运行的 Windows 系统时,请启用Use Volume Shadow Copy - Save the virtual disk to another physical drive.将虚拟磁盘保存到另一个物理驱动器。
- Do not save the image onto the source disk.不要将图像保存到源磁盘上。
A bootable conversion must include both the Windows volume and its boot partition. 可启动的转换文件必须同时包含 Windows 卷及其启动分区。
After conversion completes:
- Copy the VHD to the Hyper-V host.将 VHD 复制到 Hyper-V 主机。
- Create another untouched copy before attempting the first boot.在尝试首次启动之前,请创建另一个未修改的副本。
- Use a separate working copy for repairs.请使用单独的工作副本进行修复。
Step 3: Create the Hyper-V Virtual Machine步骤 3:创建 Hyper-V 虚拟机
Open Hyper-V Manager and create a new virtual machine.打开 Hyper-V 管理器并创建一个新的虚拟机。
Use the following configuration:请使用以下配置:
| Setting环境 | Recommended value推荐值 |
|---|---|
| Generation一代 | Generation 1第一代 |
| Startup memory启动内存 | 4096 MB |
| Virtual processors虚拟处理器 | 2 |
| Boot disk启动盘 | Existing VHD location |
| Disk controller磁盘控制器 | IDE Controller 0, Location |
| Network网络 | Disconnected initially最初断开连接 |
Windows 7 should use a Generation 1 VM. Generation 2 uses UEFI-based virtual hardware and does not support older guest operating systems in the same way. Windows 7 应该使用第一代虚拟机。第二代虚拟机使用基于 UEFI 的虚拟硬件,对旧版客户操作系统的支持方式不同。
Do not attach the boot disk to the Hyper-V SCSI controller.不要将启动磁盘连接到 Hyper-V SCSI 控制器。 (Generation 1 VMs boot from IDE drives – there is no support for SCSI or SATA 第一代虚拟机是从 IDE 硬盘启动的—— 不支持 SCSI 或 SATA)
Step 4: Attempt the First Boot步骤 4:尝试首次启动
Start the VM.启动虚拟机。
The first boot may take longer because Windows must detect the new virtual hardware.首次启动可能需要更长时间,因为 Windows 需要检测新的虚拟硬件。
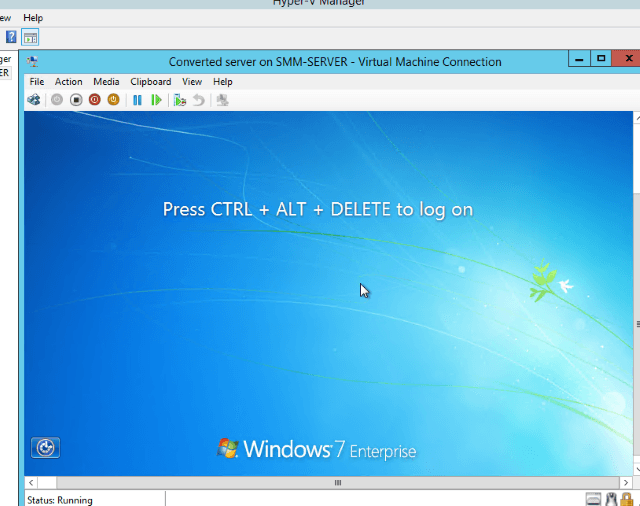
Possible results include:可能的结果包括:
- Windows boots successfully.Windows 系统启动成功。
- Windows enters Startup Repair.Windows 进入启动修复模式。
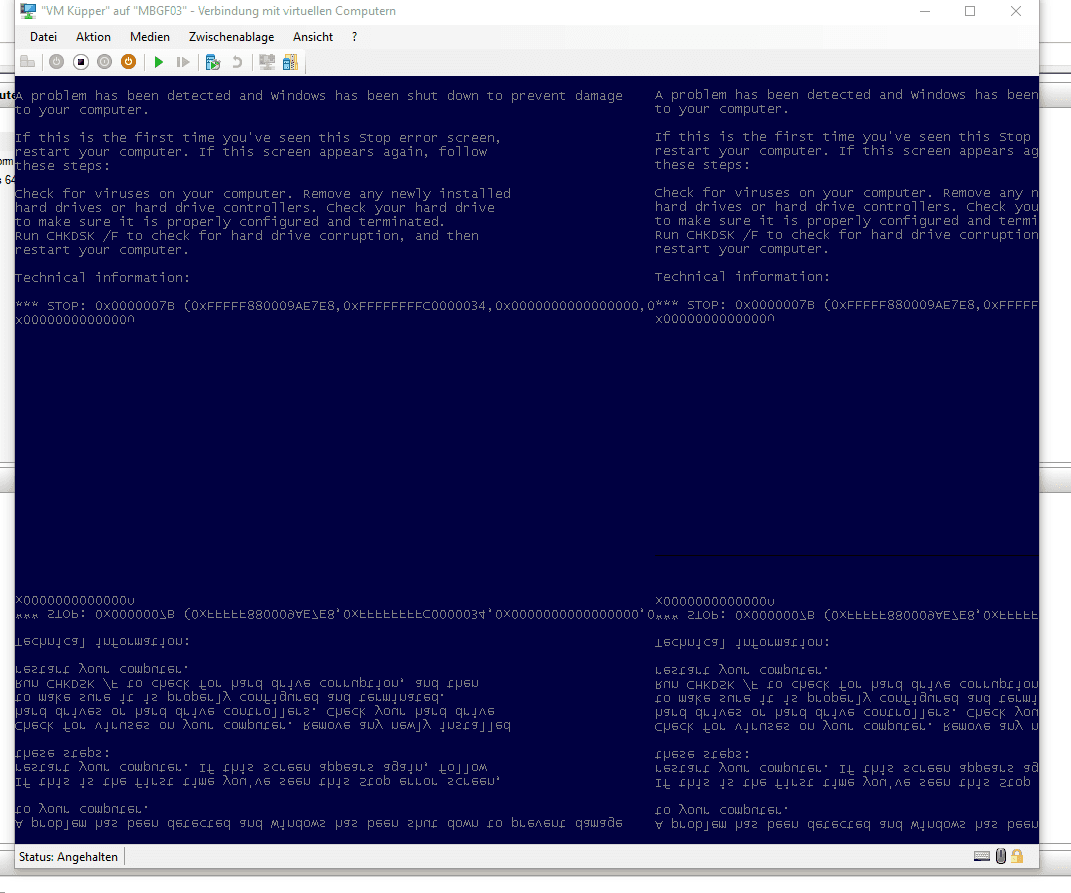
- Windows displays
STOP 0x0000007B.Windows 显示STOP 0x0000007B。 - Windows repeatedly restarts.Windows 系统反复重启。
If Windows boots successfully, continue to the post-conversion checks.如果 Windows 启动成功,则继续进行转换后检查。
If it shows 0x0000007B, continue with the storage-driver repair below.如果显示 0x0000007B ,请继续执行下面的存储驱动程序修复。
Step 5: Post-Conversion Checks
After Windows starts:Windows 启动后:
- Log in using a local administrator account.使用本地管理员帐户登录。
- Confirm that the required files are present.确认所需文件均已存在。
- Open the required legacy applications.打开所需的旧版应用程序。
- Check Device Manager for failed devices.检查设备管理器中是否存在故障设备。
- Remove obsolete hardware utilities if they cause errors, including:如果过时的硬件实用程序导致错误,请将其移除,包括:
- Motherboard monitoring software主板监控软件
- Intel Rapid Storage utilities英特尔快速存储实用程序
- Physical GPU utilities物理 GPU 实用程序
- Vendor-specific hardware tools厂商特定硬件工具
- Check the computer name.请核对计算机名称。
- Check for a configured static IP address.检查是否已配置静态 IP 地址。
- Check domain membership.检查域成员资格。
- Check application licensing.检查应用程序许可。
- Check Windows activation status.检查 Windows 激活状态。
Windows activation may be affected because the virtual motherboard is different from the original physical system.由于虚拟主板与原始物理系统不同,Windows 激活可能会受到影响。
Step 6: Network Safety
Do not connect the VM to the production network until the following have been checked:在检查完以下各项之前,请勿将虚拟机连接到生产网络:
- Duplicate computer name重复的计算机名称
- Duplicate static IP address重复的静态 IP 地址
- Existing domain membership现有域成员资格
- Scheduled tasks计划任务
- Legacy backup software传统备份软件
- Email or database services电子邮件或数据库服务
- Vendor services that may automatically start供应商服务可能会自动启动
- Security software that may no longer be supported可能已停止支持的安全软件
Do not run the physical computer and the converted VM on the same network at the same time unless the VM identity and network configuration have been changed.除非虚拟机标识和网络配置已更改,否则请勿在同一网络上同时运行物理计算机和转换后的虚拟机。
Fix 0x0000007B bootup error
Understanding Error 0x0000007B理解错误 0x0000007B
The physical computer may have been configured to load SATA, AHCI, Intel RST, or another storage-controller driver during startup.物理计算机可能已配置为在启动时加载 SATA、AHCI、Intel RST 或其他存储控制器驱动程序。
A Hyper-V Generation 1 VM presents its boot disk through an emulated IDE controller. If the required IDE boot drivers are disabled in the offline Windows registry, Windows cannot access its own system disk and stops with:第一代 Hyper-V 虚拟机通过模拟的 IDE 控制器提供其启动磁盘。如果所需的 IDE 启动驱动程序在脱机 Windows 注册表中被禁用,Windows 将无法访问其自身的系统磁盘,并停止运行,同时显示以下错误:
STOP 0x0000007B – INACCESSIBLE_BOOT_DEVICESTOP 0x0000007B – 无法访问的启动设备
Boot Hiren’s BootCD PE启动 Hiren 的 BootCD PE
- Shut down the VM.关闭虚拟机。
- Open the VM settings.打开虚拟机设置。
- Add a DVD drive under
IDE Controller 1.在IDE Controller 1下添加 DVD 驱动器。 - Attach the Hiren’s BootCD PE ISO.附加 Hiren 的 BootCD PE ISO。
- Move the DVD drive above the hard drive in the VM BIOS boot order.在虚拟机 BIOS 启动顺序中,将 DVD 驱动器移到硬盘驱动器之上。
- Start the VM and boot into HBCD PE.启动虚拟机并启动进入 HBCD PE。
Repair the Hyper-V IDE Boot Drivers修复 Hyper-V IDE 启动驱动程序
Before running the repair, confirm these files exist:运行修复程序之前,请确认以下文件是否存在:
dir C:\Windows\System32\drivers\intelide.sys
dir C:\Windows\System32\drivers\pciide.sys
dir C:\Windows\System32\drivers\atapi.sys
Create a file named:创建一个名为以下名称的文件:Fix-HyperV-IDE.bat
Paste the following commands into the file:将以下命令粘贴到文件中:
@echo off
setlocal

echo Checking the offline Windows 7 installation...

if not exist "C:\Windows\System32\Config\SYSTEM" (
    echo ERROR: Windows 7 SYSTEM registry hive was not found on C:
    pause
    exit /b 1
)

if not exist "C:\Windows\System32\drivers\intelide.sys" (
    echo ERROR: intelide.sys is missing.
    pause
    exit /b 1
)

if not exist "C:\Windows\System32\drivers\pciide.sys" (
    echo ERROR: pciide.sys is missing.
    pause
    exit /b 1
)

if not exist "C:\Windows\System32\drivers\atapi.sys" (
    echo ERROR: atapi.sys is missing.
    pause
    exit /b 1
)

echo Creating a backup of the SYSTEM registry hive...

if not exist "C:\Windows\System32\Config\SYSTEM.before-hyperv.bak" (
    copy "C:\Windows\System32\Config\SYSTEM" "C:\Windows\System32\Config\SYSTEM.before-hyperv.bak"
)

echo Loading the offline Windows 7 SYSTEM registry...

reg unload HKLM\W7SYSTEM >nul 2>&1
reg load HKLM\W7SYSTEM "C:\Windows\System32\Config\SYSTEM"

if errorlevel 1 (
    echo ERROR: Unable to load the Windows 7 SYSTEM registry hive.
    pause
    exit /b 1
)

for %%C in (ControlSet001 ControlSet002) do (

    echo Configuring %%C...

    reg add "HKLM\W7SYSTEM\%%C\Services\intelide" /v Type /t REG_DWORD /d 1 /f
    reg add "HKLM\W7SYSTEM\%%C\Services\intelide" /v Start /t REG_DWORD /d 0 /f
    reg add "HKLM\W7SYSTEM\%%C\Services\intelide" /v ErrorControl /t REG_DWORD /d 1 /f
    reg add "HKLM\W7SYSTEM\%%C\Services\intelide" /v Group /t REG_SZ /d "System Bus Extender" /f
    reg add "HKLM\W7SYSTEM\%%C\Services\intelide" /v Tag /t REG_DWORD /d 4 /f
    reg add "HKLM\W7SYSTEM\%%C\Services\intelide" /v ImagePath /t REG_EXPAND_SZ /d "system32\DRIVERS\intelide.sys" /f

    reg add "HKLM\W7SYSTEM\%%C\Services\pciide" /v Type /t REG_DWORD /d 1 /f
    reg add "HKLM\W7SYSTEM\%%C\Services\pciide" /v Start /t REG_DWORD /d 0 /f
    reg add "HKLM\W7SYSTEM\%%C\Services\pciide" /v ErrorControl /t REG_DWORD /d 1 /f
    reg add "HKLM\W7SYSTEM\%%C\Services\pciide" /v Group /t REG_SZ /d "System Bus Extender" /f
    reg add "HKLM\W7SYSTEM\%%C\Services\pciide" /v Tag /t REG_DWORD /d 3 /f
    reg add "HKLM\W7SYSTEM\%%C\Services\pciide" /v ImagePath /t REG_EXPAND_SZ /d "system32\DRIVERS\pciide.sys" /f

    reg add "HKLM\W7SYSTEM\%%C\Services\atapi" /v Type /t REG_DWORD /d 1 /f
    reg add "HKLM\W7SYSTEM\%%C\Services\atapi" /v Start /t REG_DWORD /d 0 /f
    reg add "HKLM\W7SYSTEM\%%C\Services\atapi" /v ErrorControl /t REG_DWORD /d 1 /f
    reg add "HKLM\W7SYSTEM\%%C\Services\atapi" /v Group /t REG_SZ /d "SCSI miniport" /f
    reg add "HKLM\W7SYSTEM\%%C\Services\atapi" /v Tag /t REG_DWORD /d 25 /f
    reg add "HKLM\W7SYSTEM\%%C\Services\atapi" /v ImagePath /t REG_EXPAND_SZ /d "system32\DRIVERS\atapi.sys" /f

    reg add "HKLM\W7SYSTEM\%%C\Control\CriticalDeviceDatabase\pci#ven_8086&dev_7111" /v ClassGUID /t REG_SZ /d "{4D36E96A-E325-11CE-BFC1-08002BE10318}" /f
    reg add "HKLM\W7SYSTEM\%%C\Control\CriticalDeviceDatabase\pci#ven_8086&dev_7111" /v Service /t REG_SZ /d "intelide" /f

    reg add "HKLM\W7SYSTEM\%%C\Control\CriticalDeviceDatabase\pci#ven_8086&dev_7110&cc_0601" /v ClassGUID /t REG_SZ /d "{4D36E97D-E325-11CE-BFC1-08002BE10318}" /f
    reg add "HKLM\W7SYSTEM\%%C\Control\CriticalDeviceDatabase\pci#ven_8086&dev_7110&cc_0601" /v Service /t REG_SZ /d "isapnp" /f

    reg add "HKLM\W7SYSTEM\%%C\Control\CriticalDeviceDatabase\primary_ide_channel" /v ClassGUID /t REG_SZ /d "{4D36E96A-E325-11CE-BFC1-08002BE10318}" /f
    reg add "HKLM\W7SYSTEM\%%C\Control\CriticalDeviceDatabase\primary_ide_channel" /v Service /t REG_SZ /d "atapi" /f

    reg add "HKLM\W7SYSTEM\%%C\Control\CriticalDeviceDatabase\secondary_ide_channel" /v ClassGUID /t REG_SZ /d "{4D36E96A-E325-11CE-BFC1-08002BE10318}" /f
    reg add "HKLM\W7SYSTEM\%%C\Control\CriticalDeviceDatabase\secondary_ide_channel" /v Service /t REG_SZ /d "atapi" /f
)

echo Unloading the offline registry...

reg unload HKLM\W7SYSTEM

if errorlevel 1 (
    echo WARNING: Registry unload failed.
    echo Close Registry Editor and run:
    echo reg unload HKLM\W7SYSTEM
    pause
    exit /b 1
)

echo.
echo Hyper-V IDE boot-driver configuration completed.
echo Shut down HBCD PE and remove the ISO.
echo Confirm the VHD is connected to IDE Controller 0.
echo Then start the Windows 7 VM.
echo.

pause
Run the file as Administrator.
This script:这段脚本:
- Creates a backup of the offline SYSTEM registry hive创建离线 SYSTEM 注册表单元的备份
- Enables
intelide启用intelide - Enables
pciide启用pciide - Enables
atapi启用atapi - Adds the Hyper-V virtual IDE controller mappings添加 Hyper-V 虚拟 IDE 控制器映射
- Applies the configuration to
ControlSet001andControlSet002将配置应用于ControlSet001和ControlSet002 - Leaves the existing SATA and AHCI drivers available保留现有的 SATA 和 AHCI 驱动程序
The registry method is based on the same underlying P2V repair approach described in the referenced Windows XP and Windows 7 conversion guides, with additional validation and backup steps. 注册表方法基于与参考的 Windows XP 和 Windows 7 转换指南中描述的相同的底层 P2V 修复方法,并增加了额外的验证和备份步骤。