Microsoft 365 Tenant Security
A basic guide to Microsoft 365 Security Checklist
Restrict User Access to Azure AD/Entra ID
block from GUI
Restrict User Access to Azure AD to Prevent Data Exposure
- Sign -in to your Microsoft Entra admin center.
- Select Users –> User Settings
- Move the toggle to ‘Yes’ under the Administration center.
- Select ‘Save’ in the top.
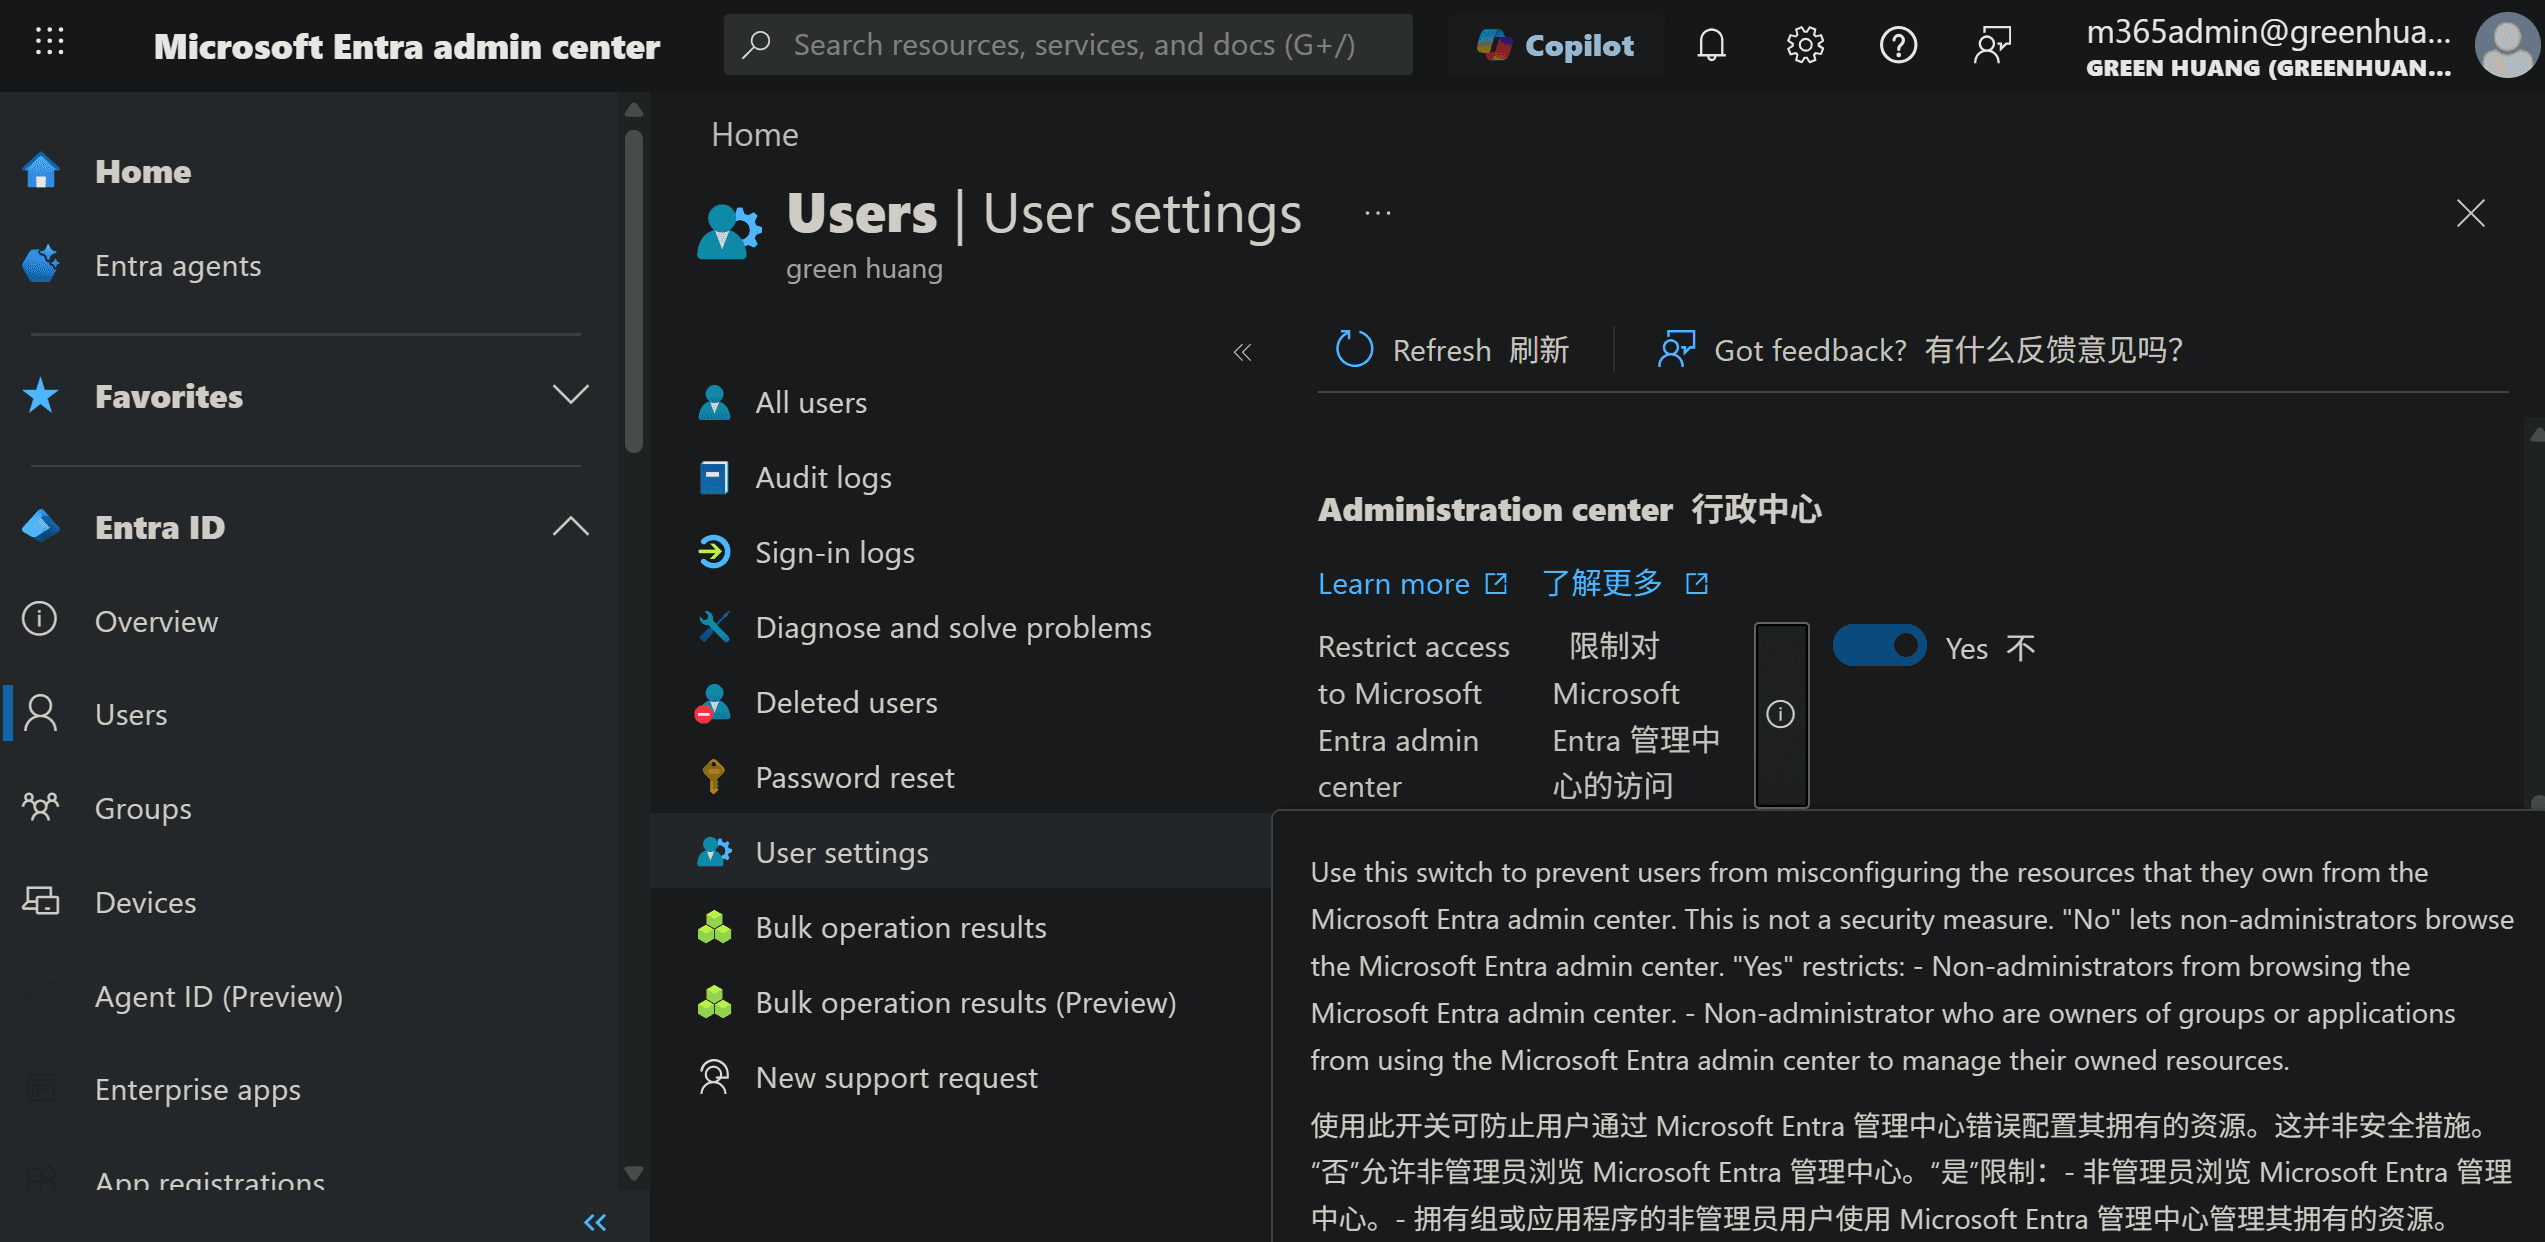
Now, the non-administrators can’t access Azure AD portal and Entra ID portal by navigating portal.azure.com and entra.microsoft.com.
block from CLI
How to Block access to Exchange Online PowerShell - o365info
install and connect Microsoft Graph PowerShell
Install-Module Microsoft.Graph -Force

Connect-MgGraph -Scopes "Directory.ReadWrite.All", "Group.ReadWrite.All", "Application.ReadWrite.All"
Block access to Exchange Online PowerShell
Create a new security group to allow access to Exchange Online PowerShell with the New-MgGroup cmdlet. This will be the group where you will add the members who will have access to Exchange Online PowerShell
$group = New-MgGroup `
 -DisplayName "EXO-PowerShell-Admins" `
 -MailEnabled:$false `
 -SecurityEnabled:$true `
 -MailNickname "exo-powershell-admins" `
 -Description "Users allowed to access Exchange Online PowerShell"

# validate
$group
Get Global Administrator role
$role = Get-MgDirectoryRole | Where-Object {$_.DisplayName -eq "Global Administrator"}

$role

# If the role is not activated:
Enable-MgDirectoryRole -DirectoryRoleTemplateId `
 (Get-MgDirectoryRoleTemplate | Where {$_.DisplayName -eq "Global Administrator"}).Id
Add all Global Admins to the group
$admins = Get-MgDirectoryRoleMember -DirectoryRoleId $role.Id

foreach ($admin in $admins) {
    New-MgGroupMember -GroupId $group.Id -DirectoryObjectId $admin.Id
}
Now all Global Admins are members of the EXO PowerShell group. you can find it in Microsoft Entra ID→ Groups→ All groups or Microsoft 365 Admin Center -> Teams & groups→ Active teams & groups→ Security
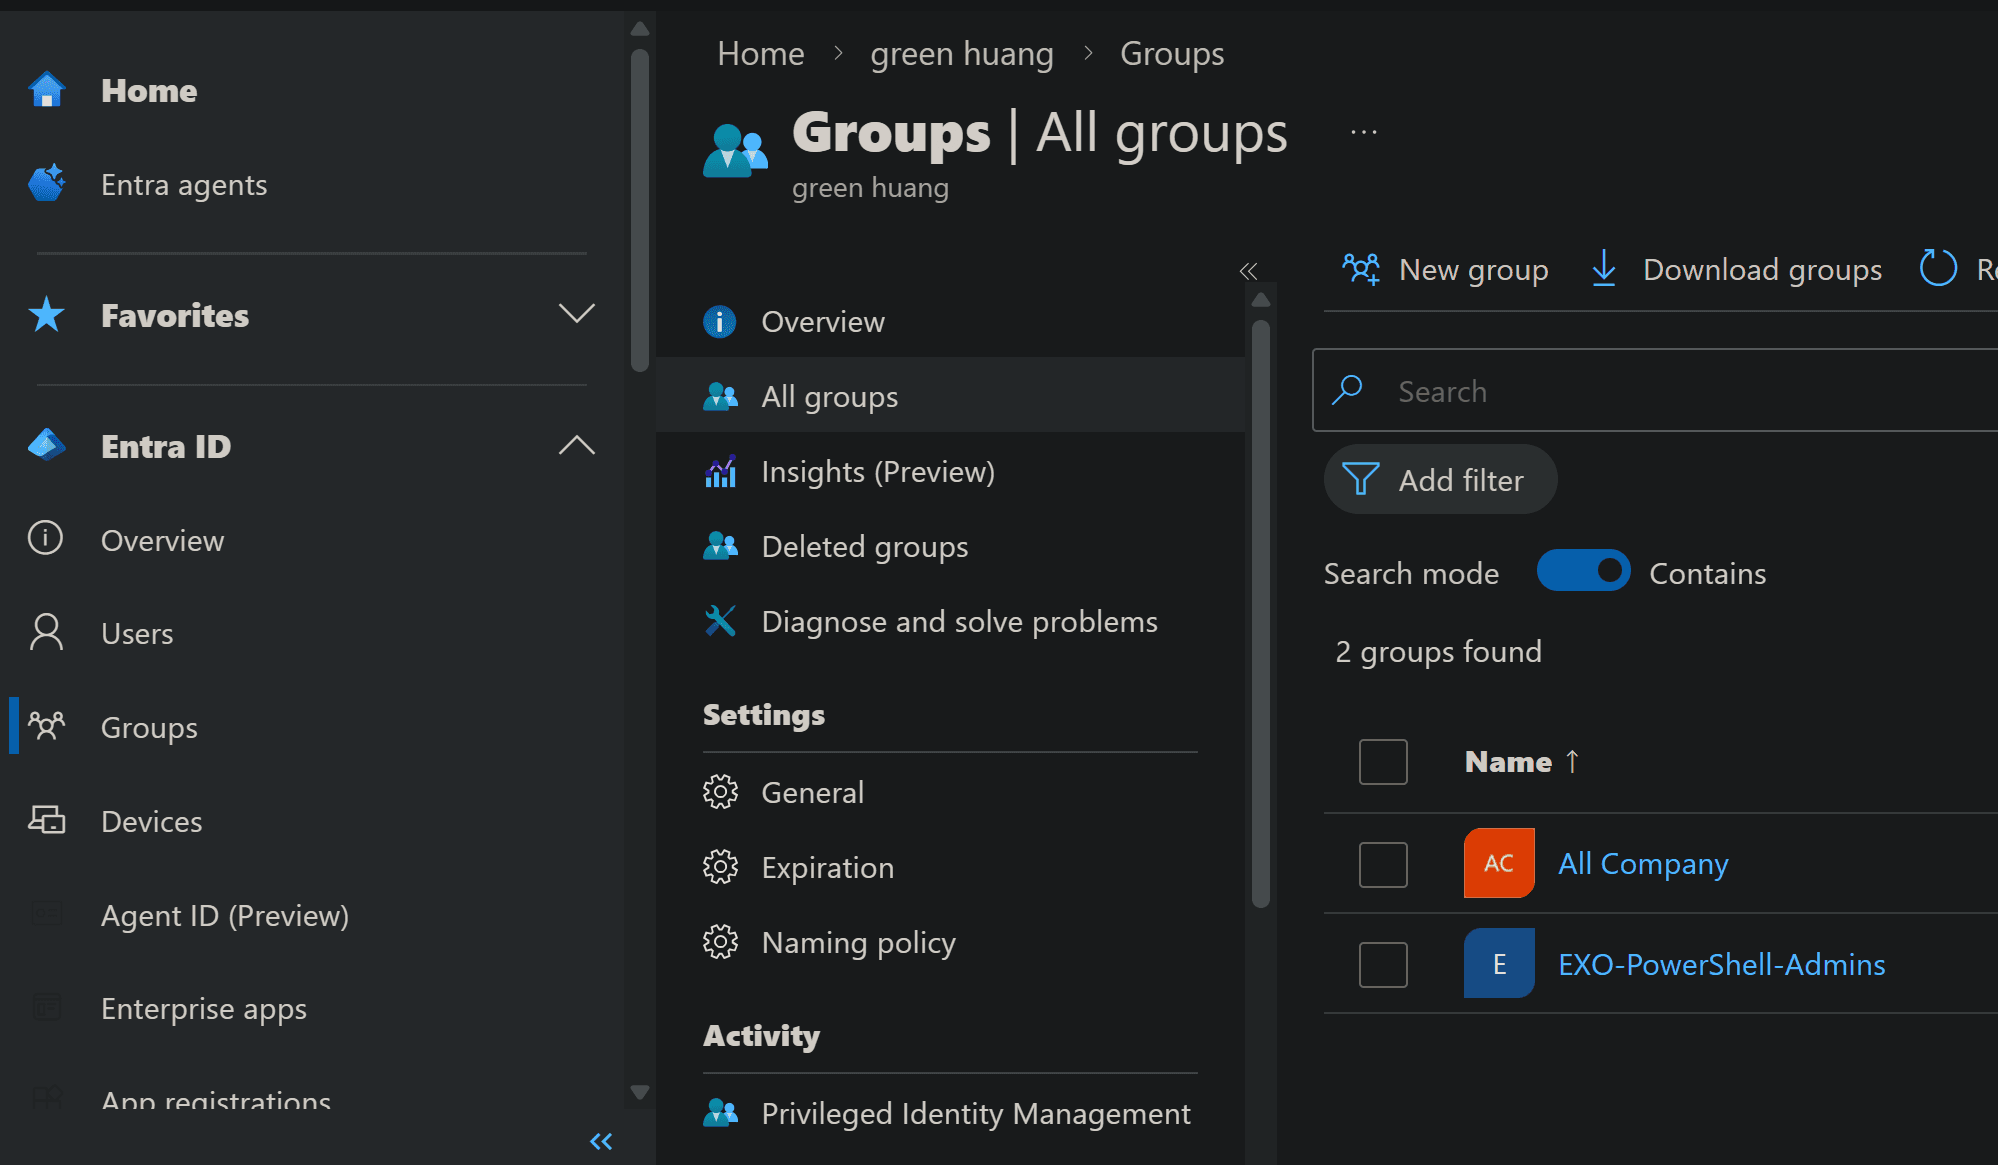
Create the service principal for the Exchange Online PowerShell app with the New-MgServicePrincipal cmdlet. The unique identifier for Microsoft Exchange REST API Based Powershell is fb78d390-0c51-40cd-8e17-fdbfab77341b
$ServicePrincipal = New-MgServicePrincipal -Appid "fb78d390-0c51-40cd-8e17-fdbfab77341b"

# validate
Get-MgServicePrincipal -ServicePrincipalId $ServicePrincipal.Id | Format-Table DisplayName, Id, AppId

# set the -AppRoleAssignmentRequired to true.
Update-MgServicePrincipal -ServicePrincipalId $ServicePrincipal.Id -AppRoleAssignmentRequired:$true

# assign an app role to the service principal.
New-MgServicePrincipalAppRoleAssignment -ServicePrincipalId $ServicePrincipal.Id -AppRoleId ([Guid]::Empty.ToString()) -ResourceId $ServicePrincipal.Id -PrincipalId $Group.Id
validate fromMicrosoft Entra ID → Enterprise applications→ Microsoft Exchange REST API Based PowerShell -> Users and groups
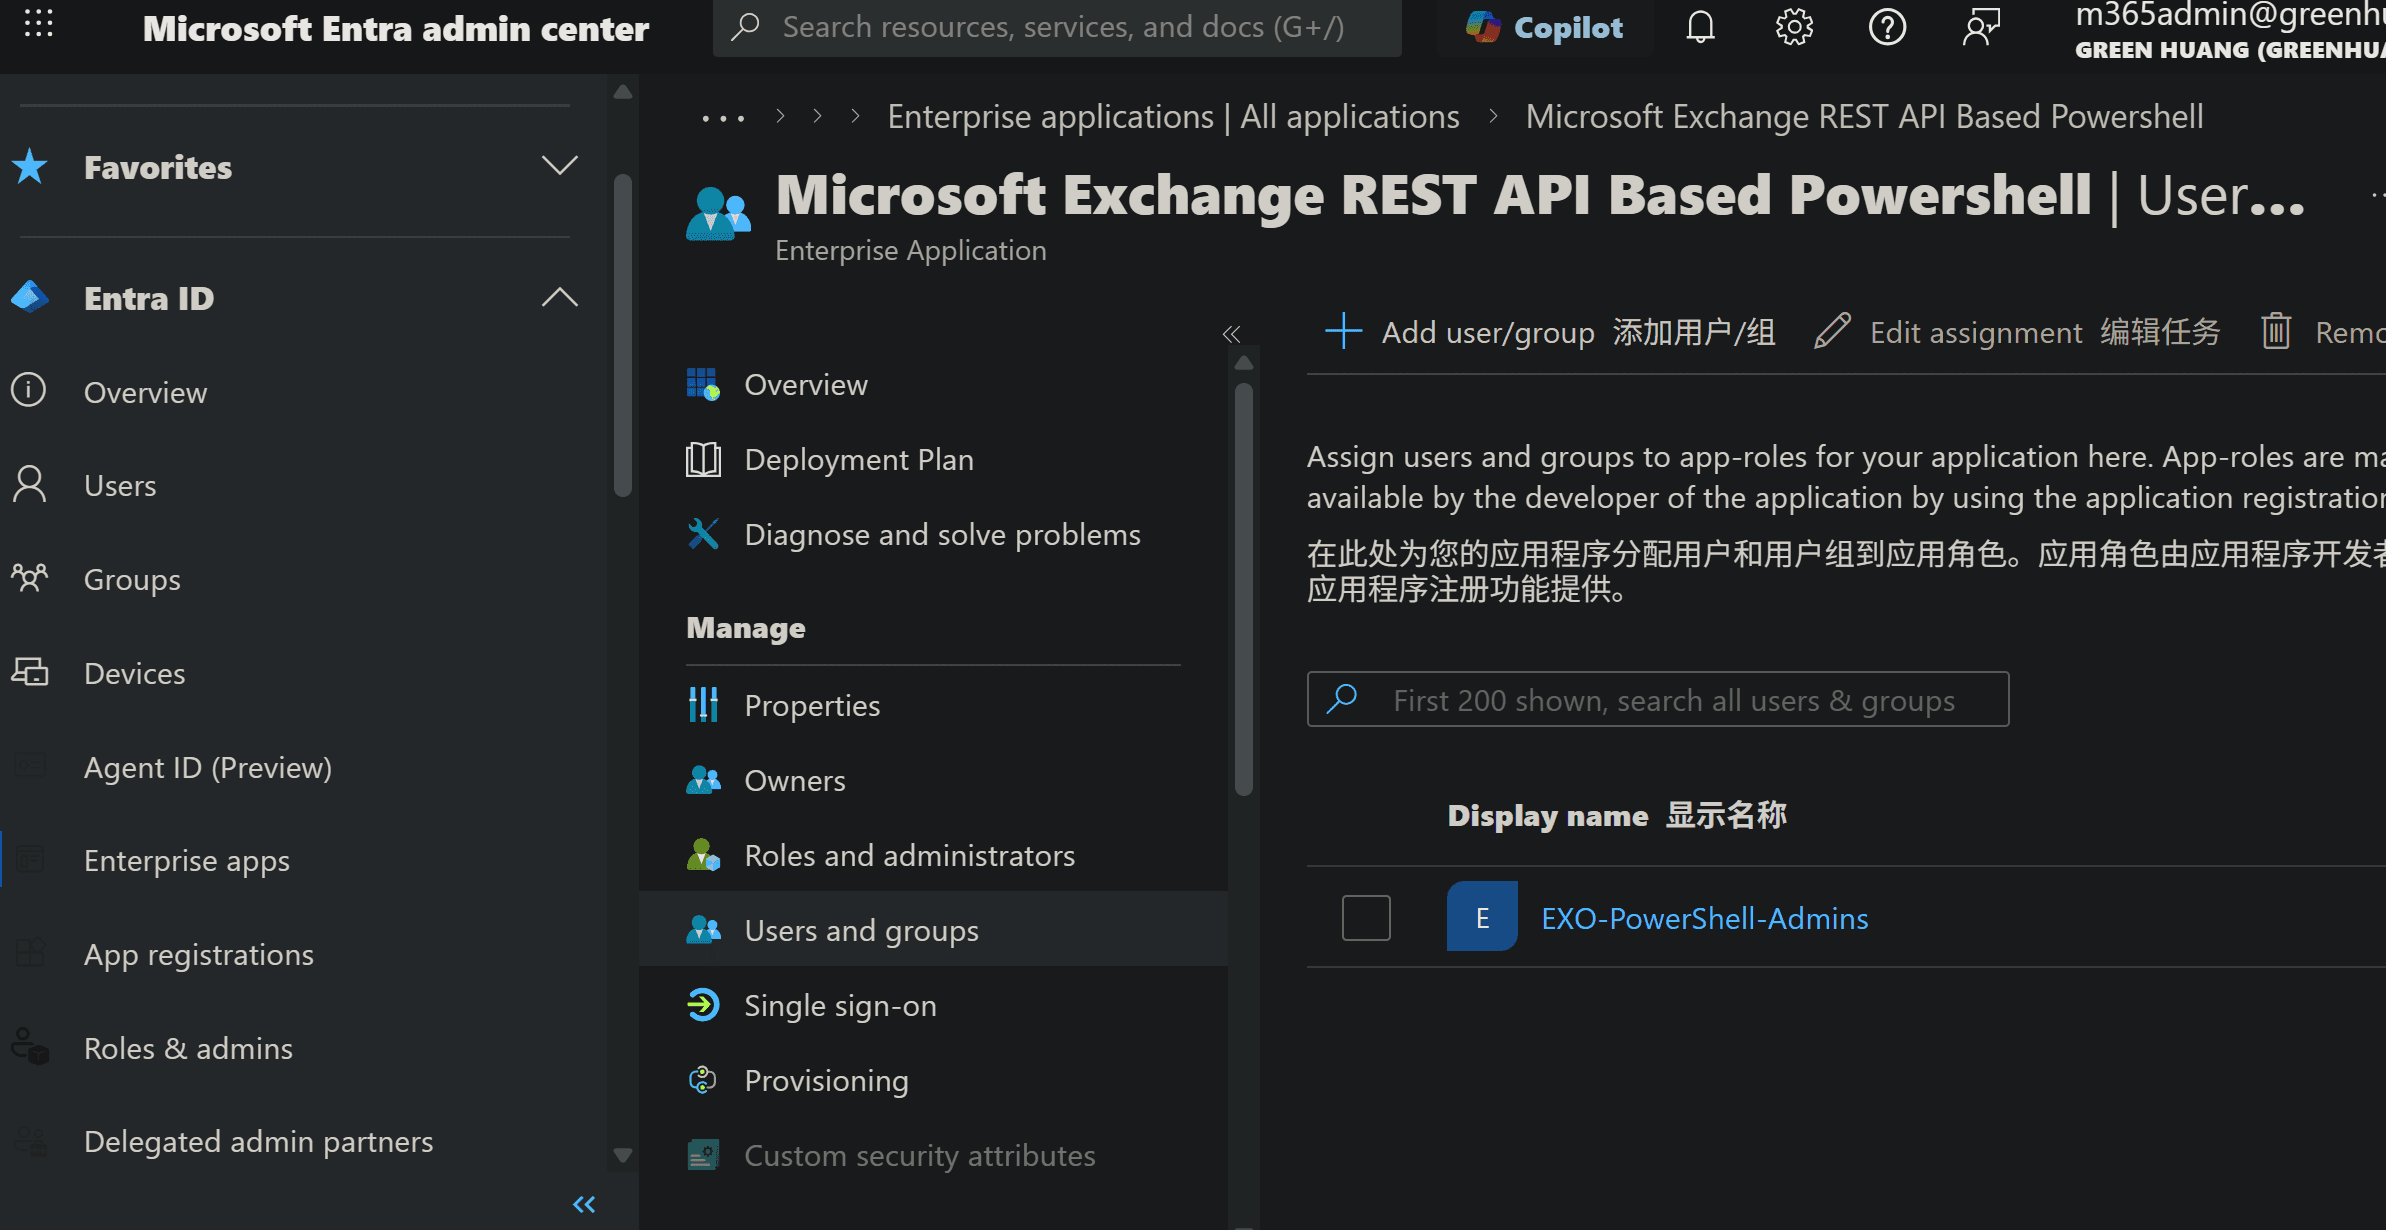
validate from ExchangeOnlineManagement
Install-Module -Name ExchangeOnlineManagement

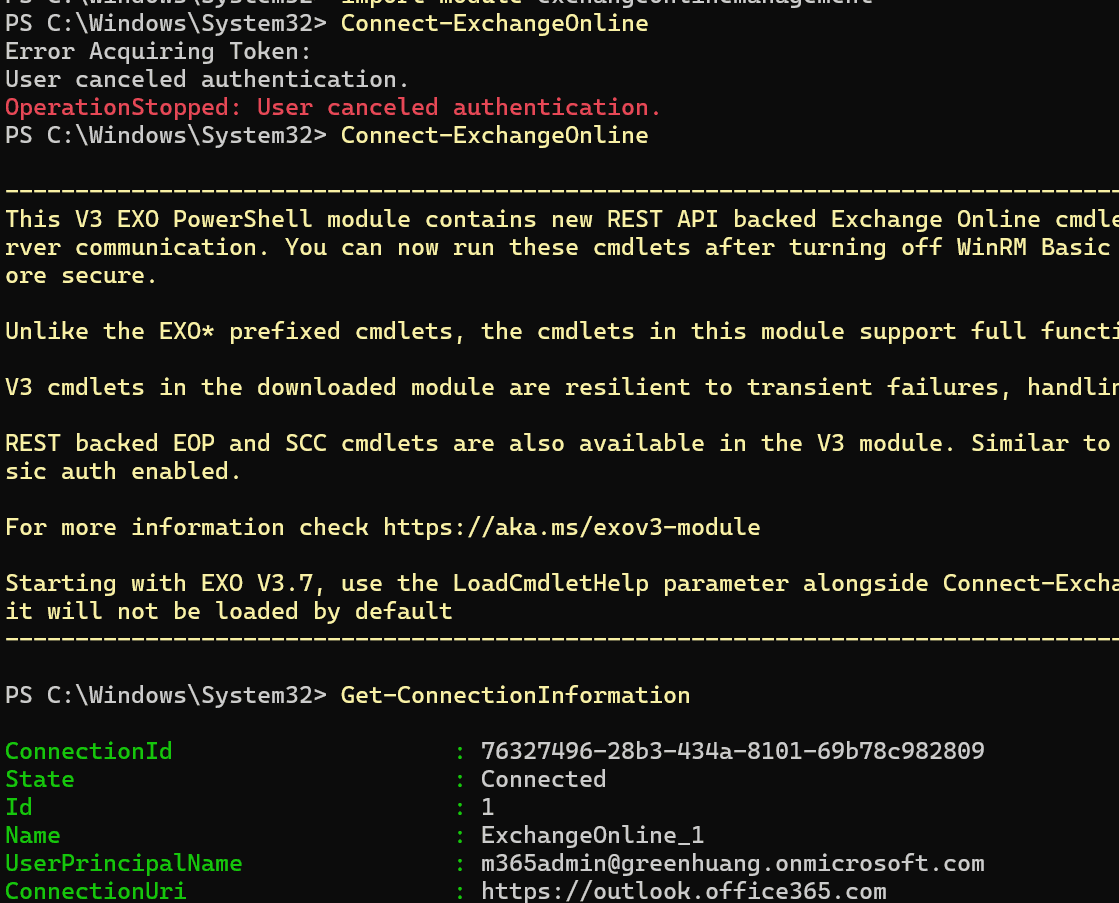
import-module exchangeonlinemanagement

Connect-ExchangeOnline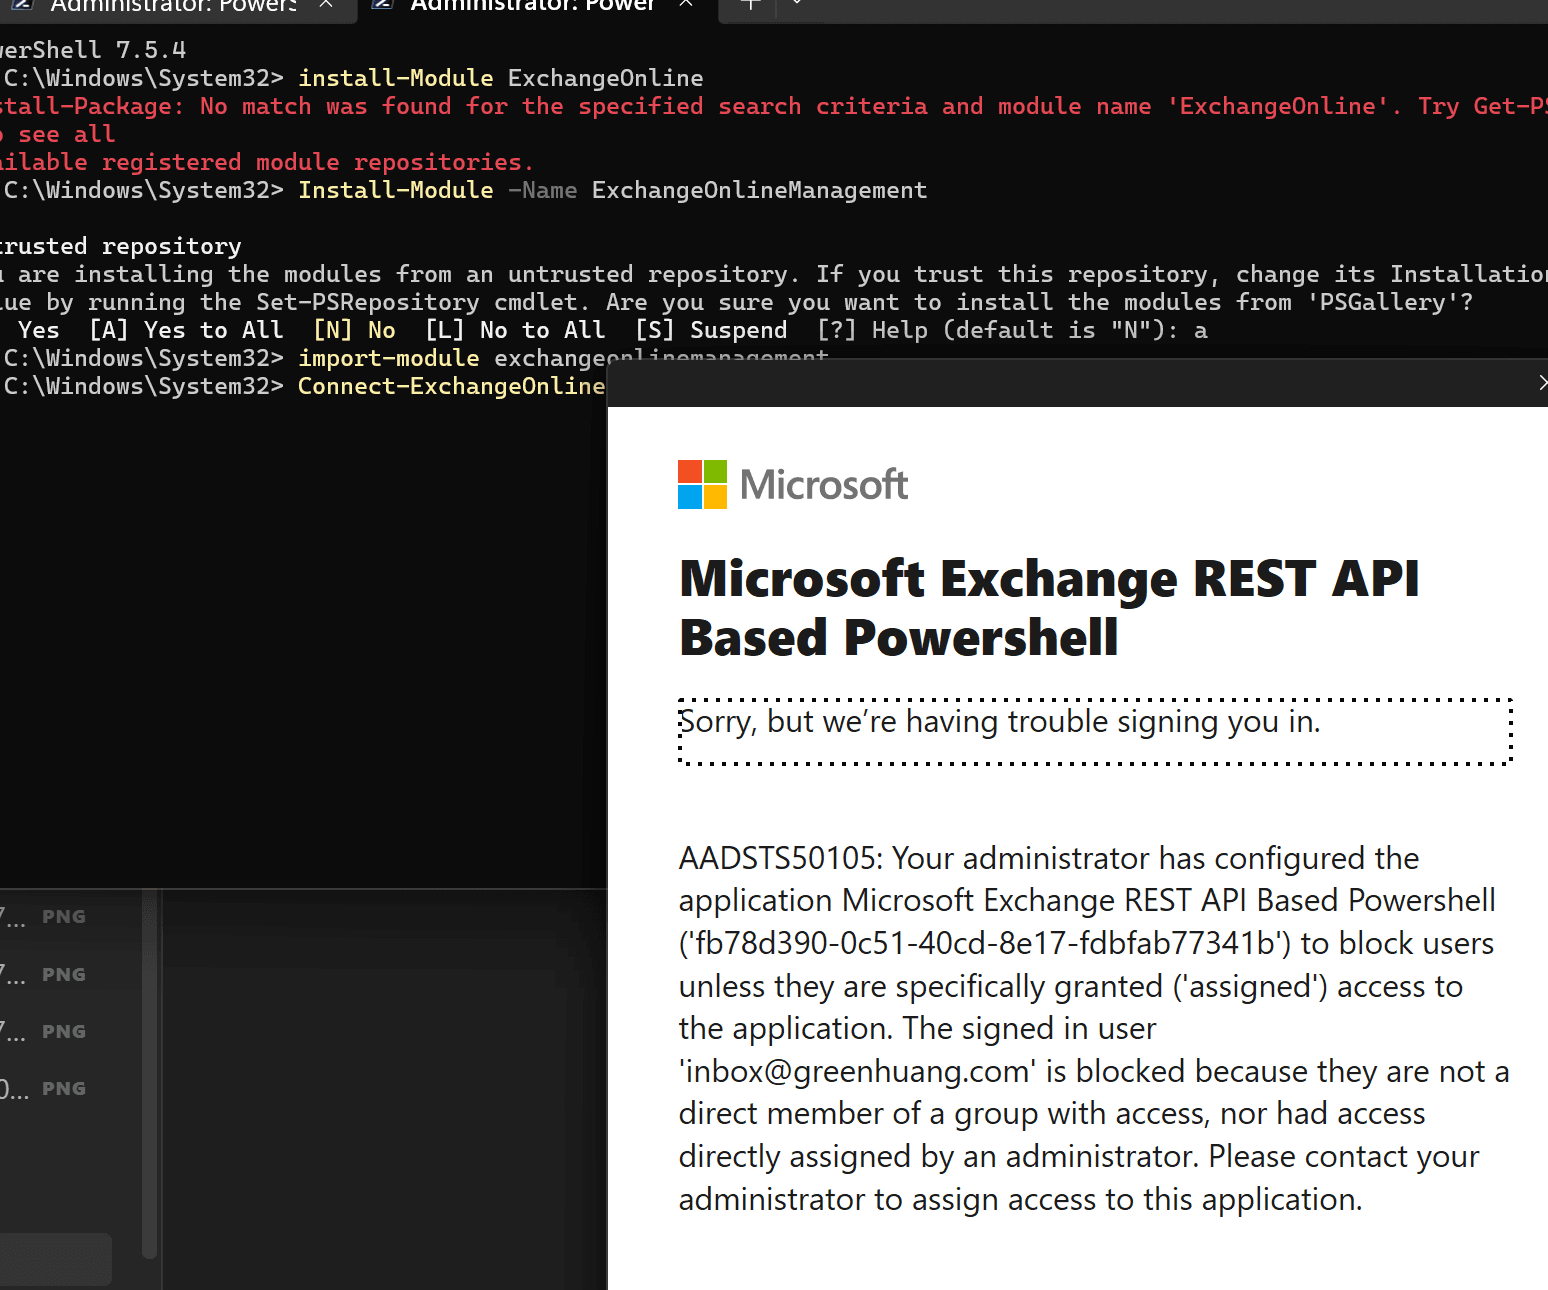
Block access to Microsoft Graph PowerShell access
# -----------------------------------------------------------
# Connect to Microsoft Graph with required permissions
# -----------------------------------------------------------
Connect-MgGraph -Scopes `
"Directory.ReadWrite.All",
"Application.ReadWrite.All",
"Group.ReadWrite.All",
"RoleManagement.Read.Directory"
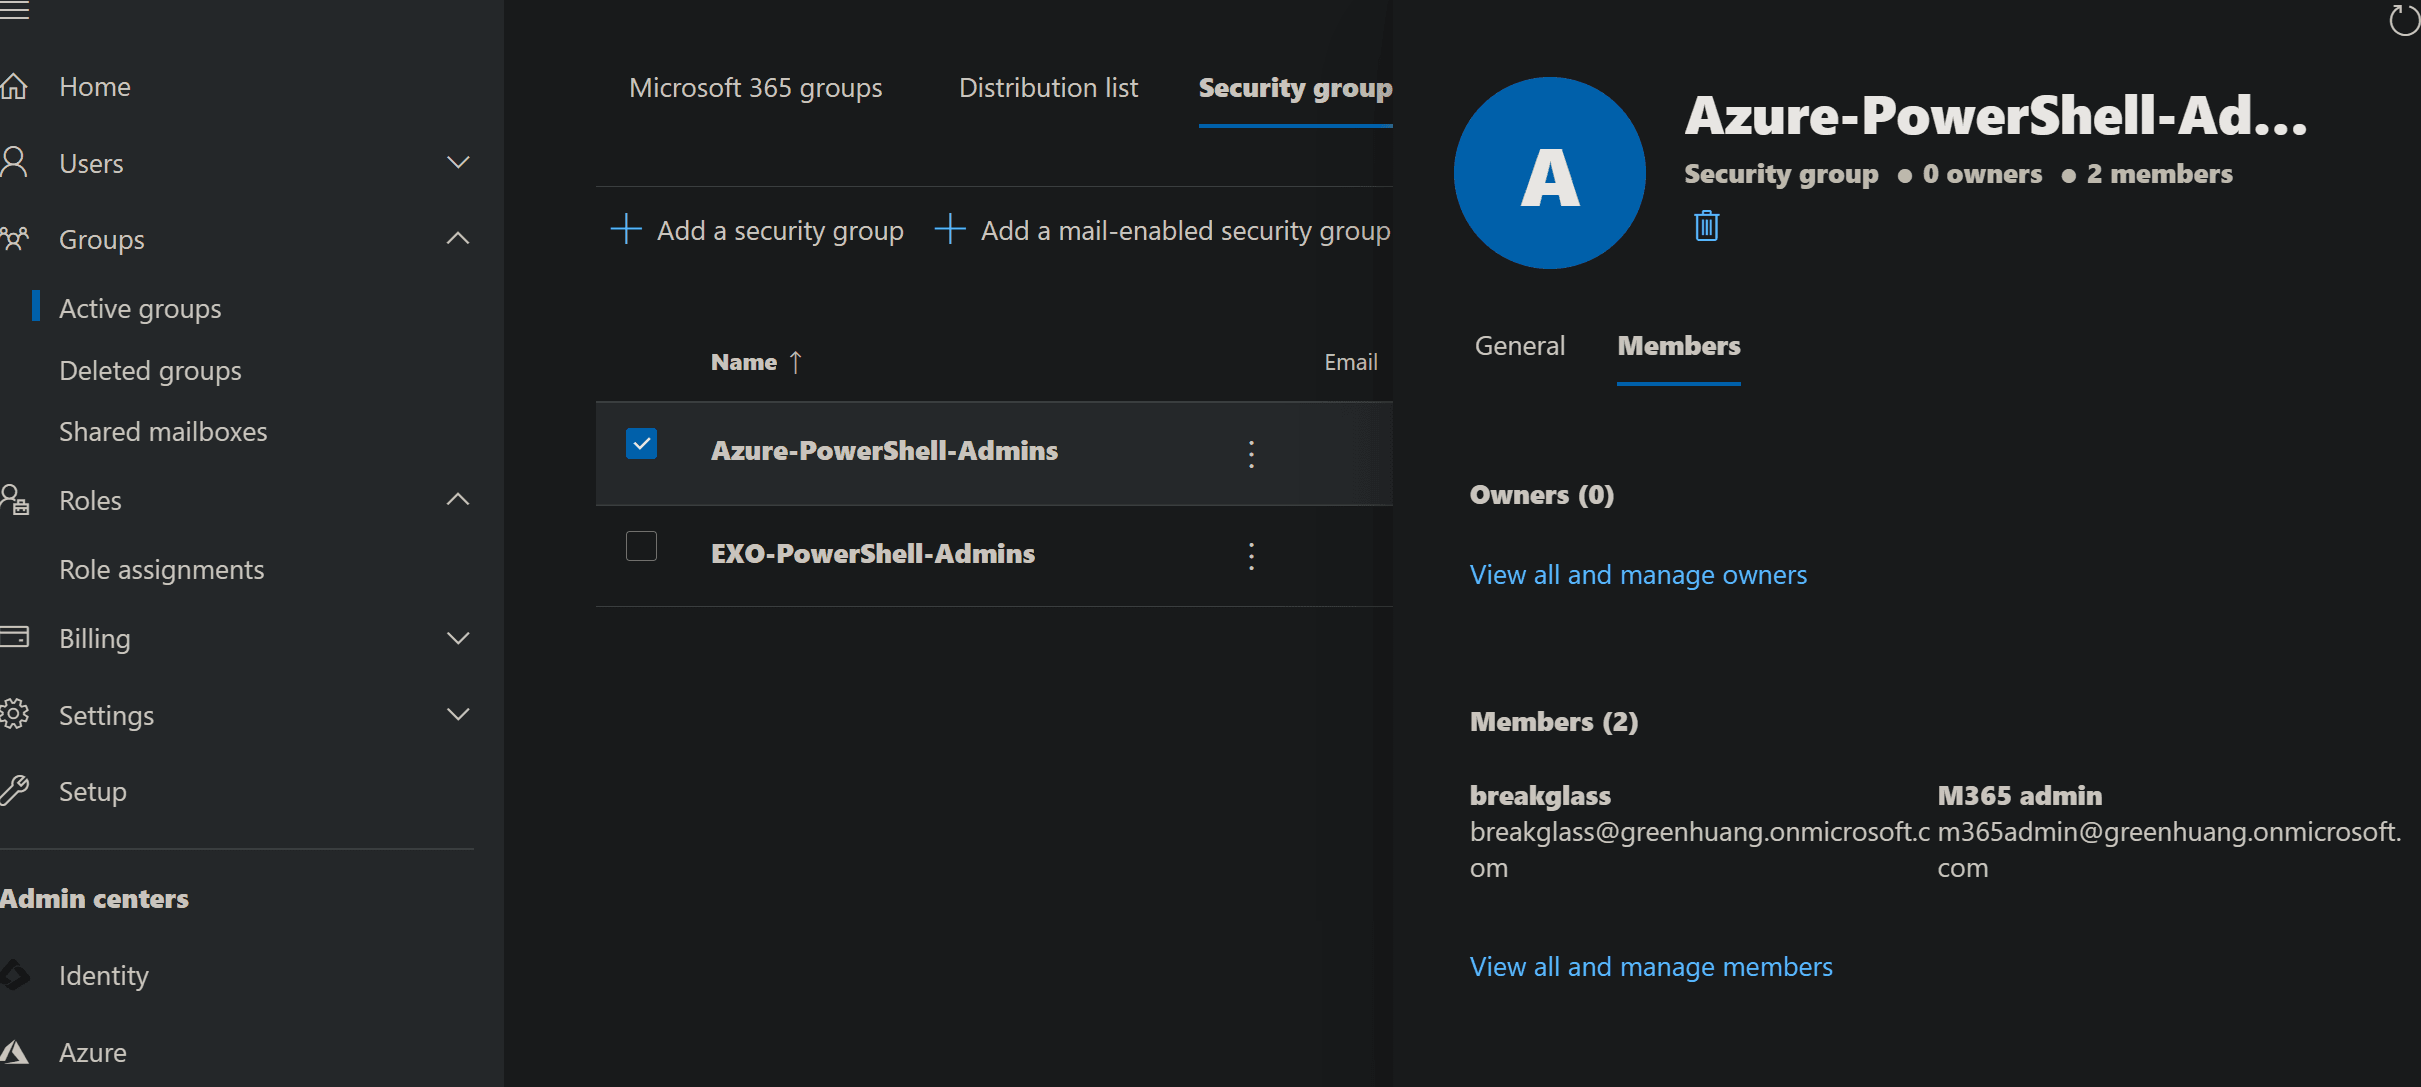
Create a security group that will be allowed to use Azure PowerShell Only Global Admins will be added to this group
$Group = New-MgGroup `
 -DisplayName "Azure-PowerShell-Admins" `
 -MailEnabled:$false `
 -SecurityEnabled:$true `
 -MailNickname "azure-powershell-admins" `
 -Description "Users allowed to run Azure PowerShell"
# -----------------------------------------------------------
# STEP 2
# Get Global Administrator role from Entra ID
# -----------------------------------------------------------
$Role = Get-MgDirectoryRole | Where-Object {$_.DisplayName -eq "Global Administrator"}Get all members of the Global Administrator role and Add Global Admins to the Azure PowerShell allowed group
$Admins = Get-MgDirectoryRoleMember -DirectoryRoleId $Role.Id

foreach ($Admin in $Admins) {
    New-MgGroupMember `
        -GroupId $Group.Id `
        -DirectoryObjectId $Admin.Id
}
Create the service principal for Azure PowerShell This registers the enterprise application in your tenant
$ServicePrincipal = New-MgServicePrincipal `
 -AppId "00000003-0000-0000-c000-000000000000"
# -----------------------------------------------------------
# STEP 6
# Validate the service principal creation
# -----------------------------------------------------------
Get-MgServicePrincipal `
-ServicePrincipalId $ServicePrincipal.Id |
Format-Table DisplayName, Id, AppId# -----------------------------------------------------------
# STEP 7
# Require assignment for the application
# This blocks everyone from using Azure PowerShell
# unless explicitly assigned
# -----------------------------------------------------------
Update-MgServicePrincipal `
-ServicePrincipalId $ServicePrincipal.Id `
-AppRoleAssignmentRequired:$true# -----------------------------------------------------------
# STEP 8
# Assign the allowed group to the application
# Only members of Azure-PowerShell-Admins can authenticate
# -----------------------------------------------------------
New-MgServicePrincipalAppRoleAssignment `
-ServicePrincipalId $ServicePrincipal.Id `
-AppRoleId ([Guid]::Empty.ToString()) `
-ResourceId $ServicePrincipal.Id `
-PrincipalId $Group.IdBlock Email Auto-Forwarding to External Domain
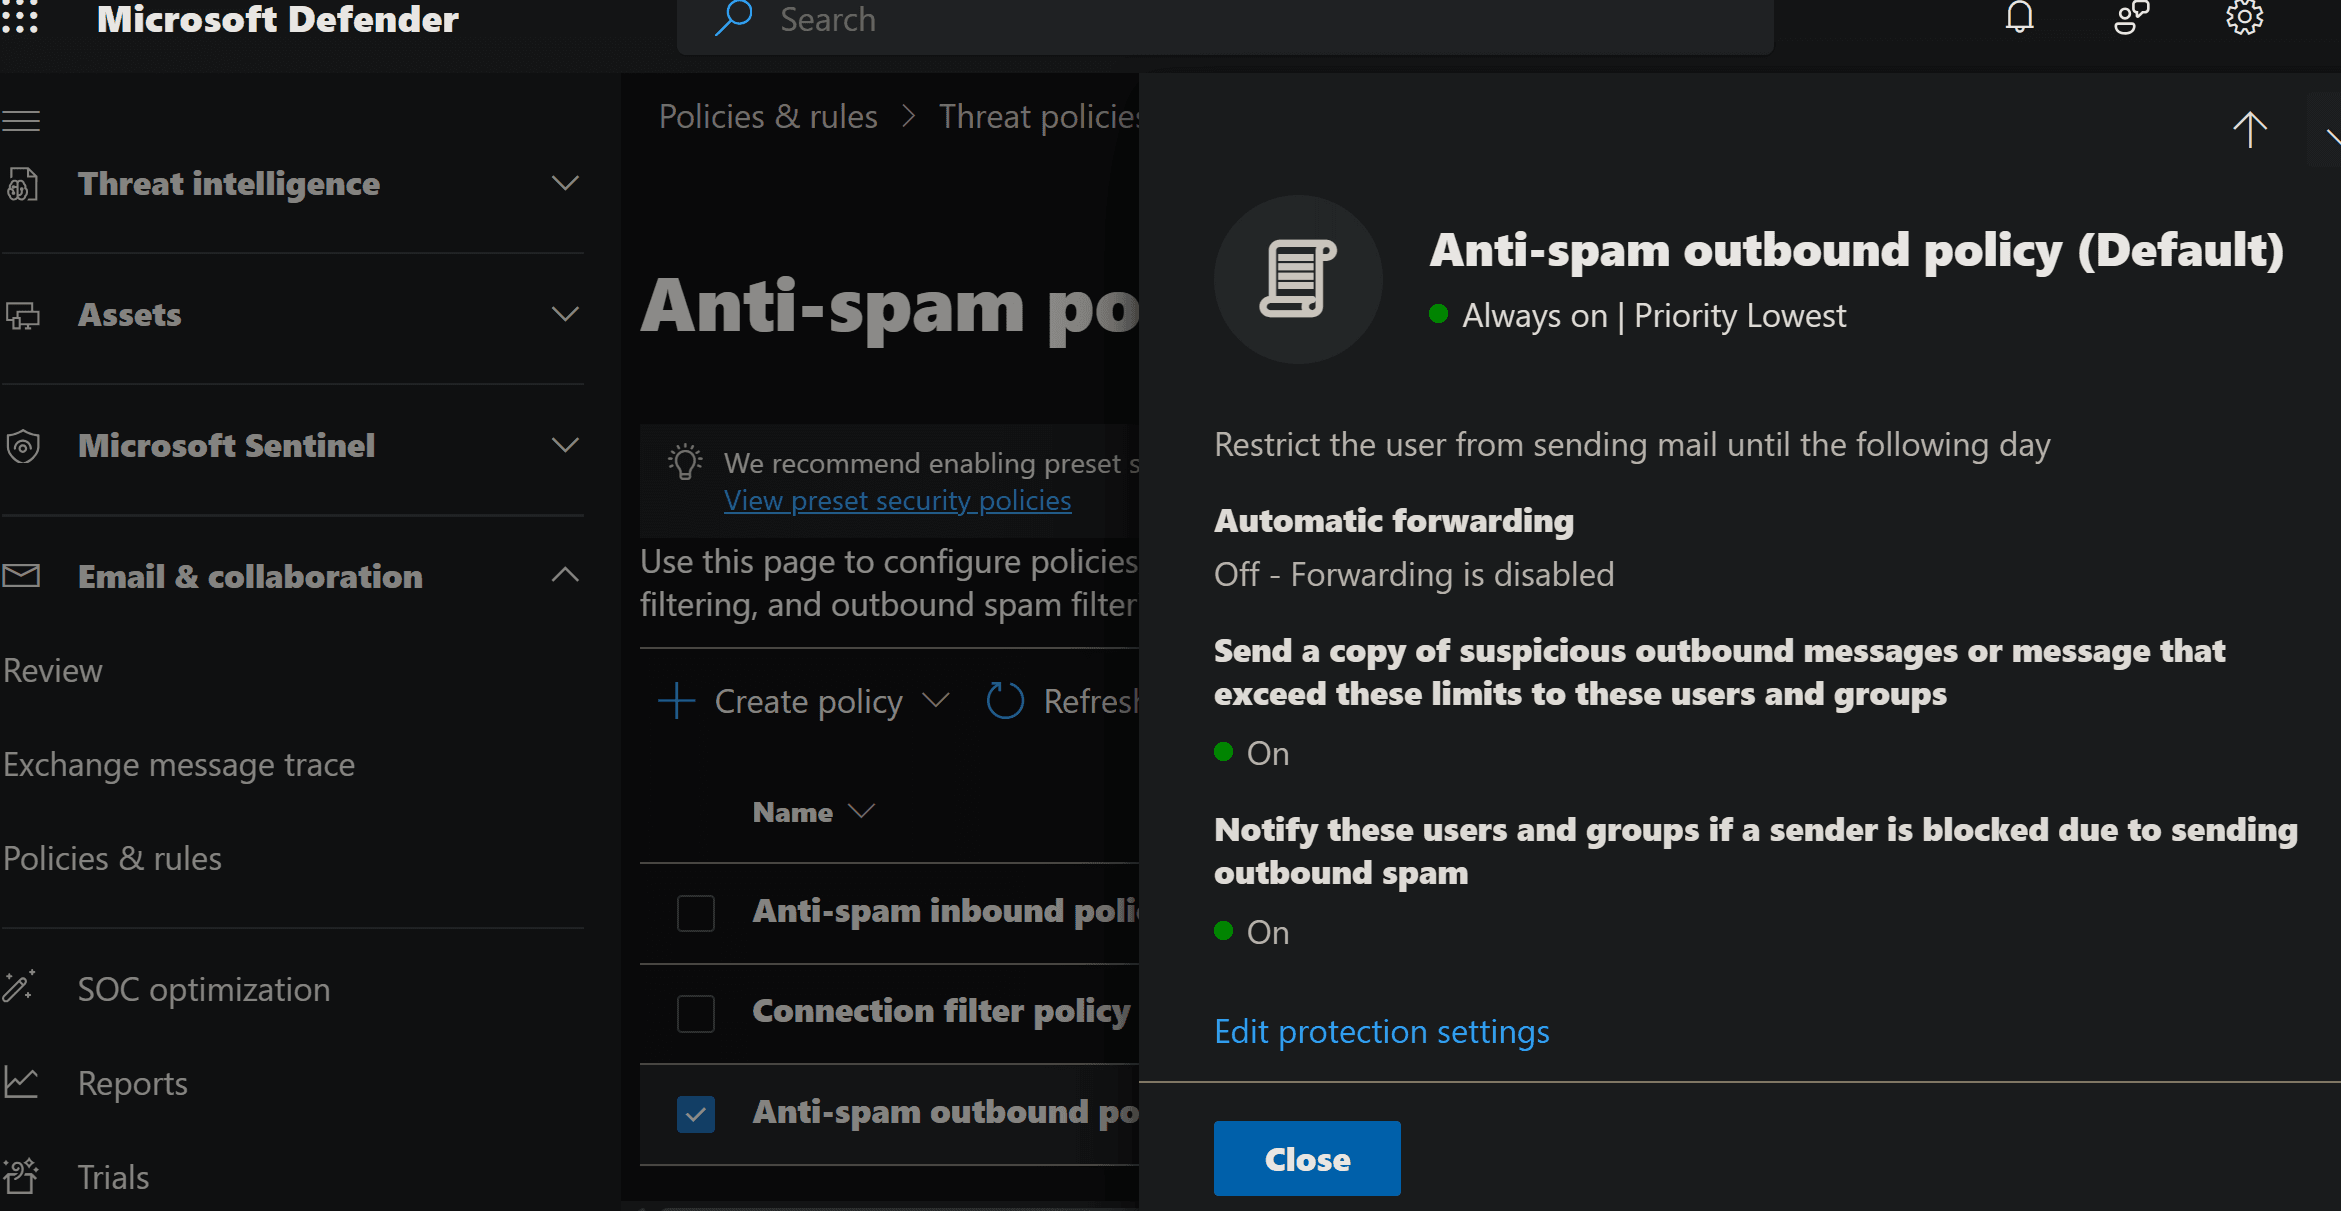
- Go to the Microsoft Defender portal > Email & collaboration > Policies & rules > Threat policies > Anti-spam.
- Edit the Anti-spam outbound policy (Default).
- Under Automatic forwarding rules, set to Off - Forwarding is disabled.
Manage User Consent to Applications in Microsoft 365
Manage User Consent to Applications in Microsoft 365 - AdminDroid Blog
- Sign in to Microsoft Entra Admin Center.
- Navigate to the following path: Applications –> Enterprise applications –> Consent and permissions –> User consent settings.
- Then, select the ‘Do not allow user consent’ setting to block the users from using all the applications they want to access.
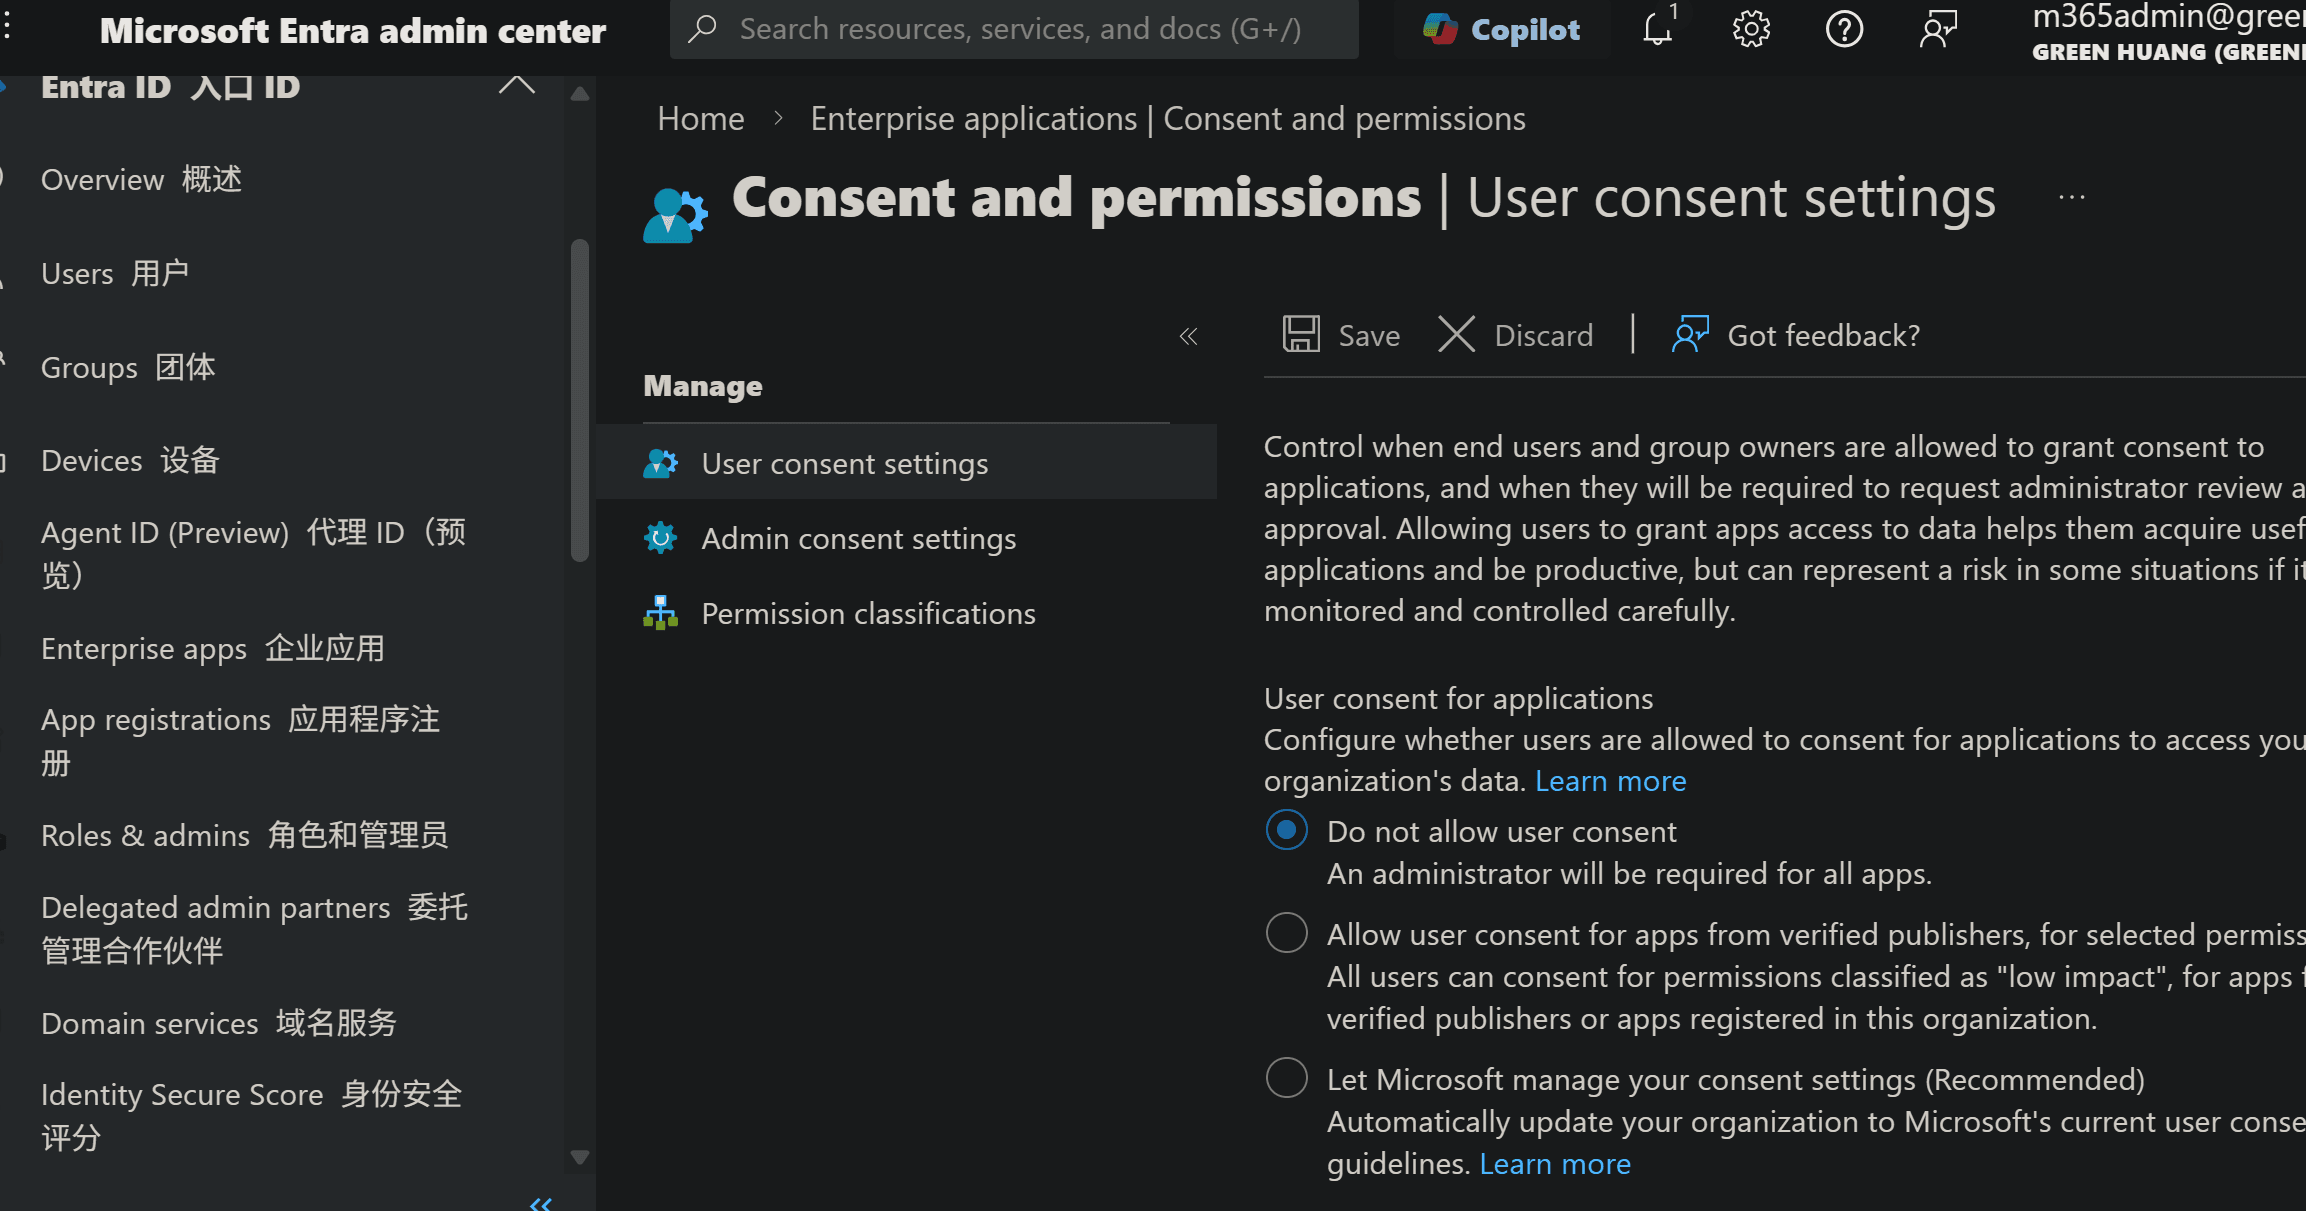
Once the user consent for apps is blocked, a user will have no right to provide consent to an app they try to access. Therefore, admins can enable ‘Admin Consent Workflow’ settings to securely grant access to the applications.
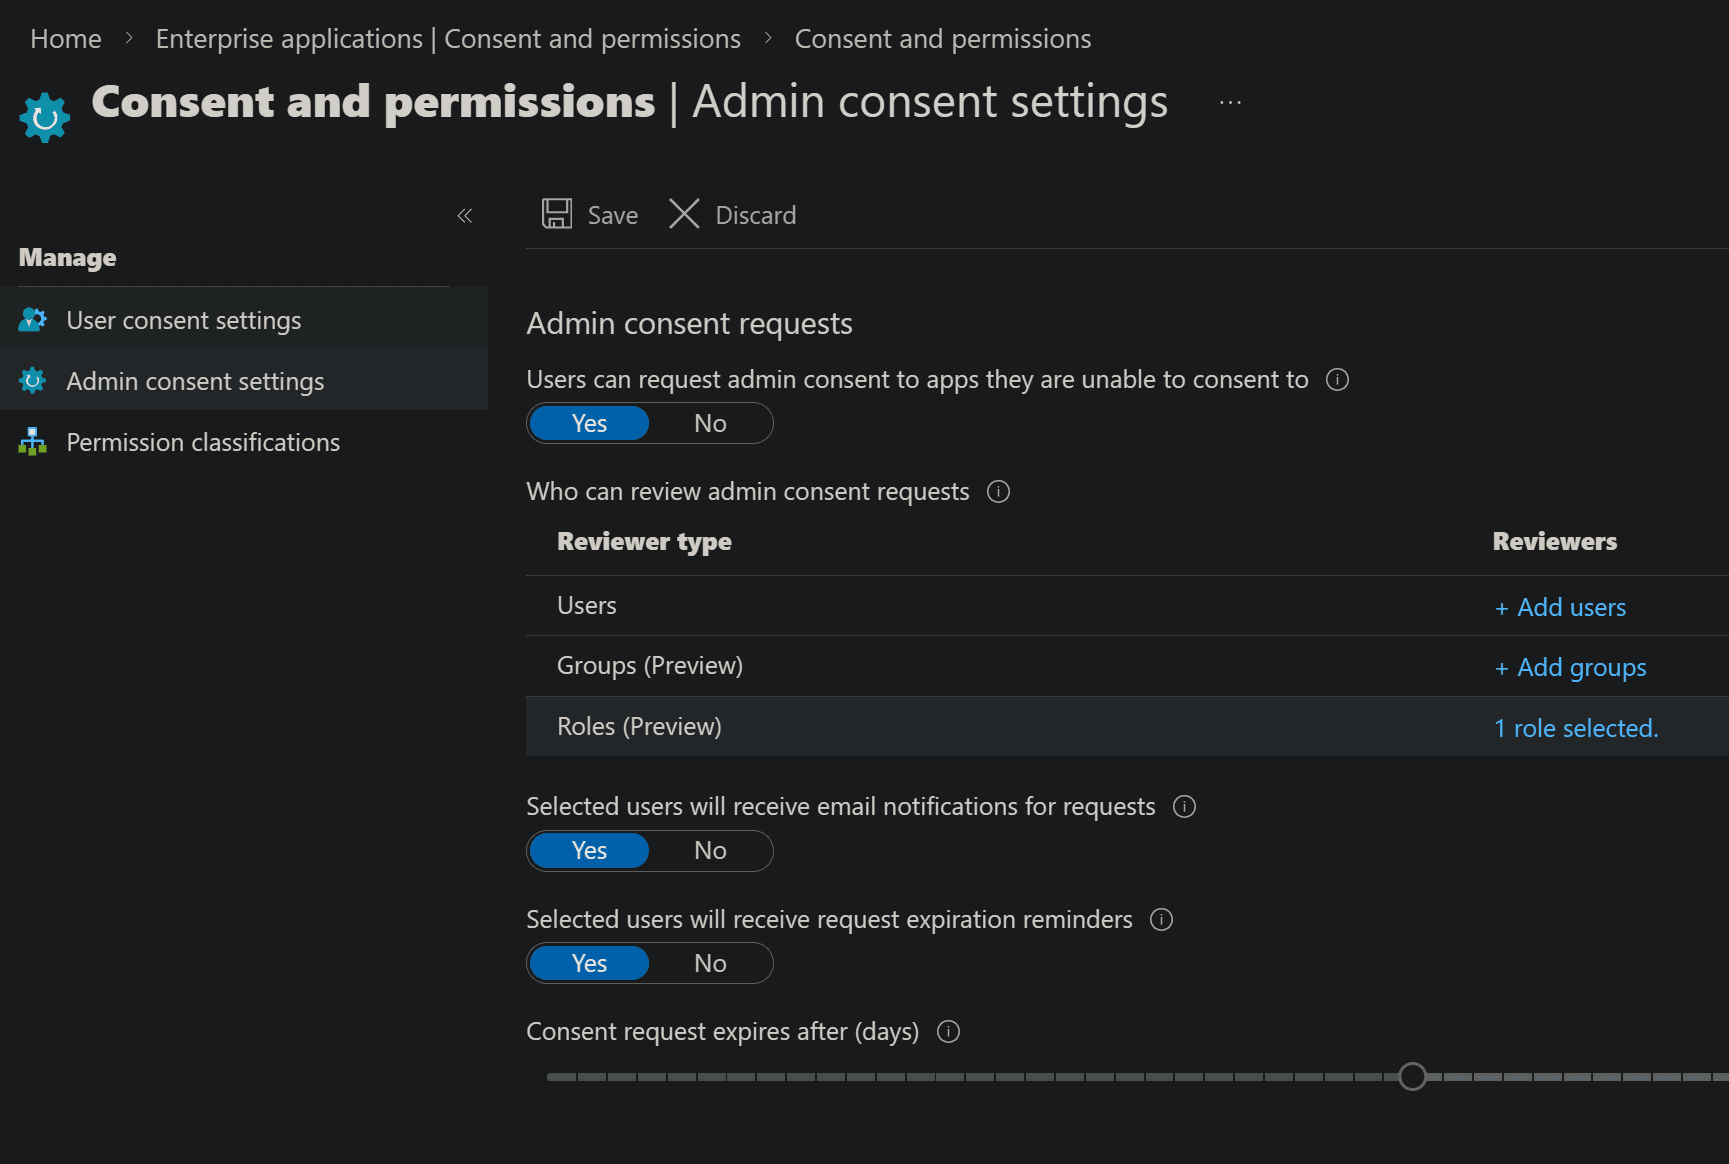
Also, admins can set a reviewer to check and approve those admin consent requests to prevent any security damages. So, follow the below steps to enable the ‘Admin Consent Workflow’ settings.
- Sign in to Microsoft Entra Admin Center.
- Navigate to Enterprise applications –> Consent and permissions –> Admin consent settings.
- Turn the ‘User can request admin consent to apps they are unable to consent to’ toggle to ‘Yes’.
- Select the reviewer (i.e., users, groups, or roles) based on your requirements.
- Click Save.
Set Up Idle Session Timeout in Microsoft 365 to Avoid Data Leakages
Enable Idle Session Timeout in Microsoft 365
- Open Microsoft 365 admin center.
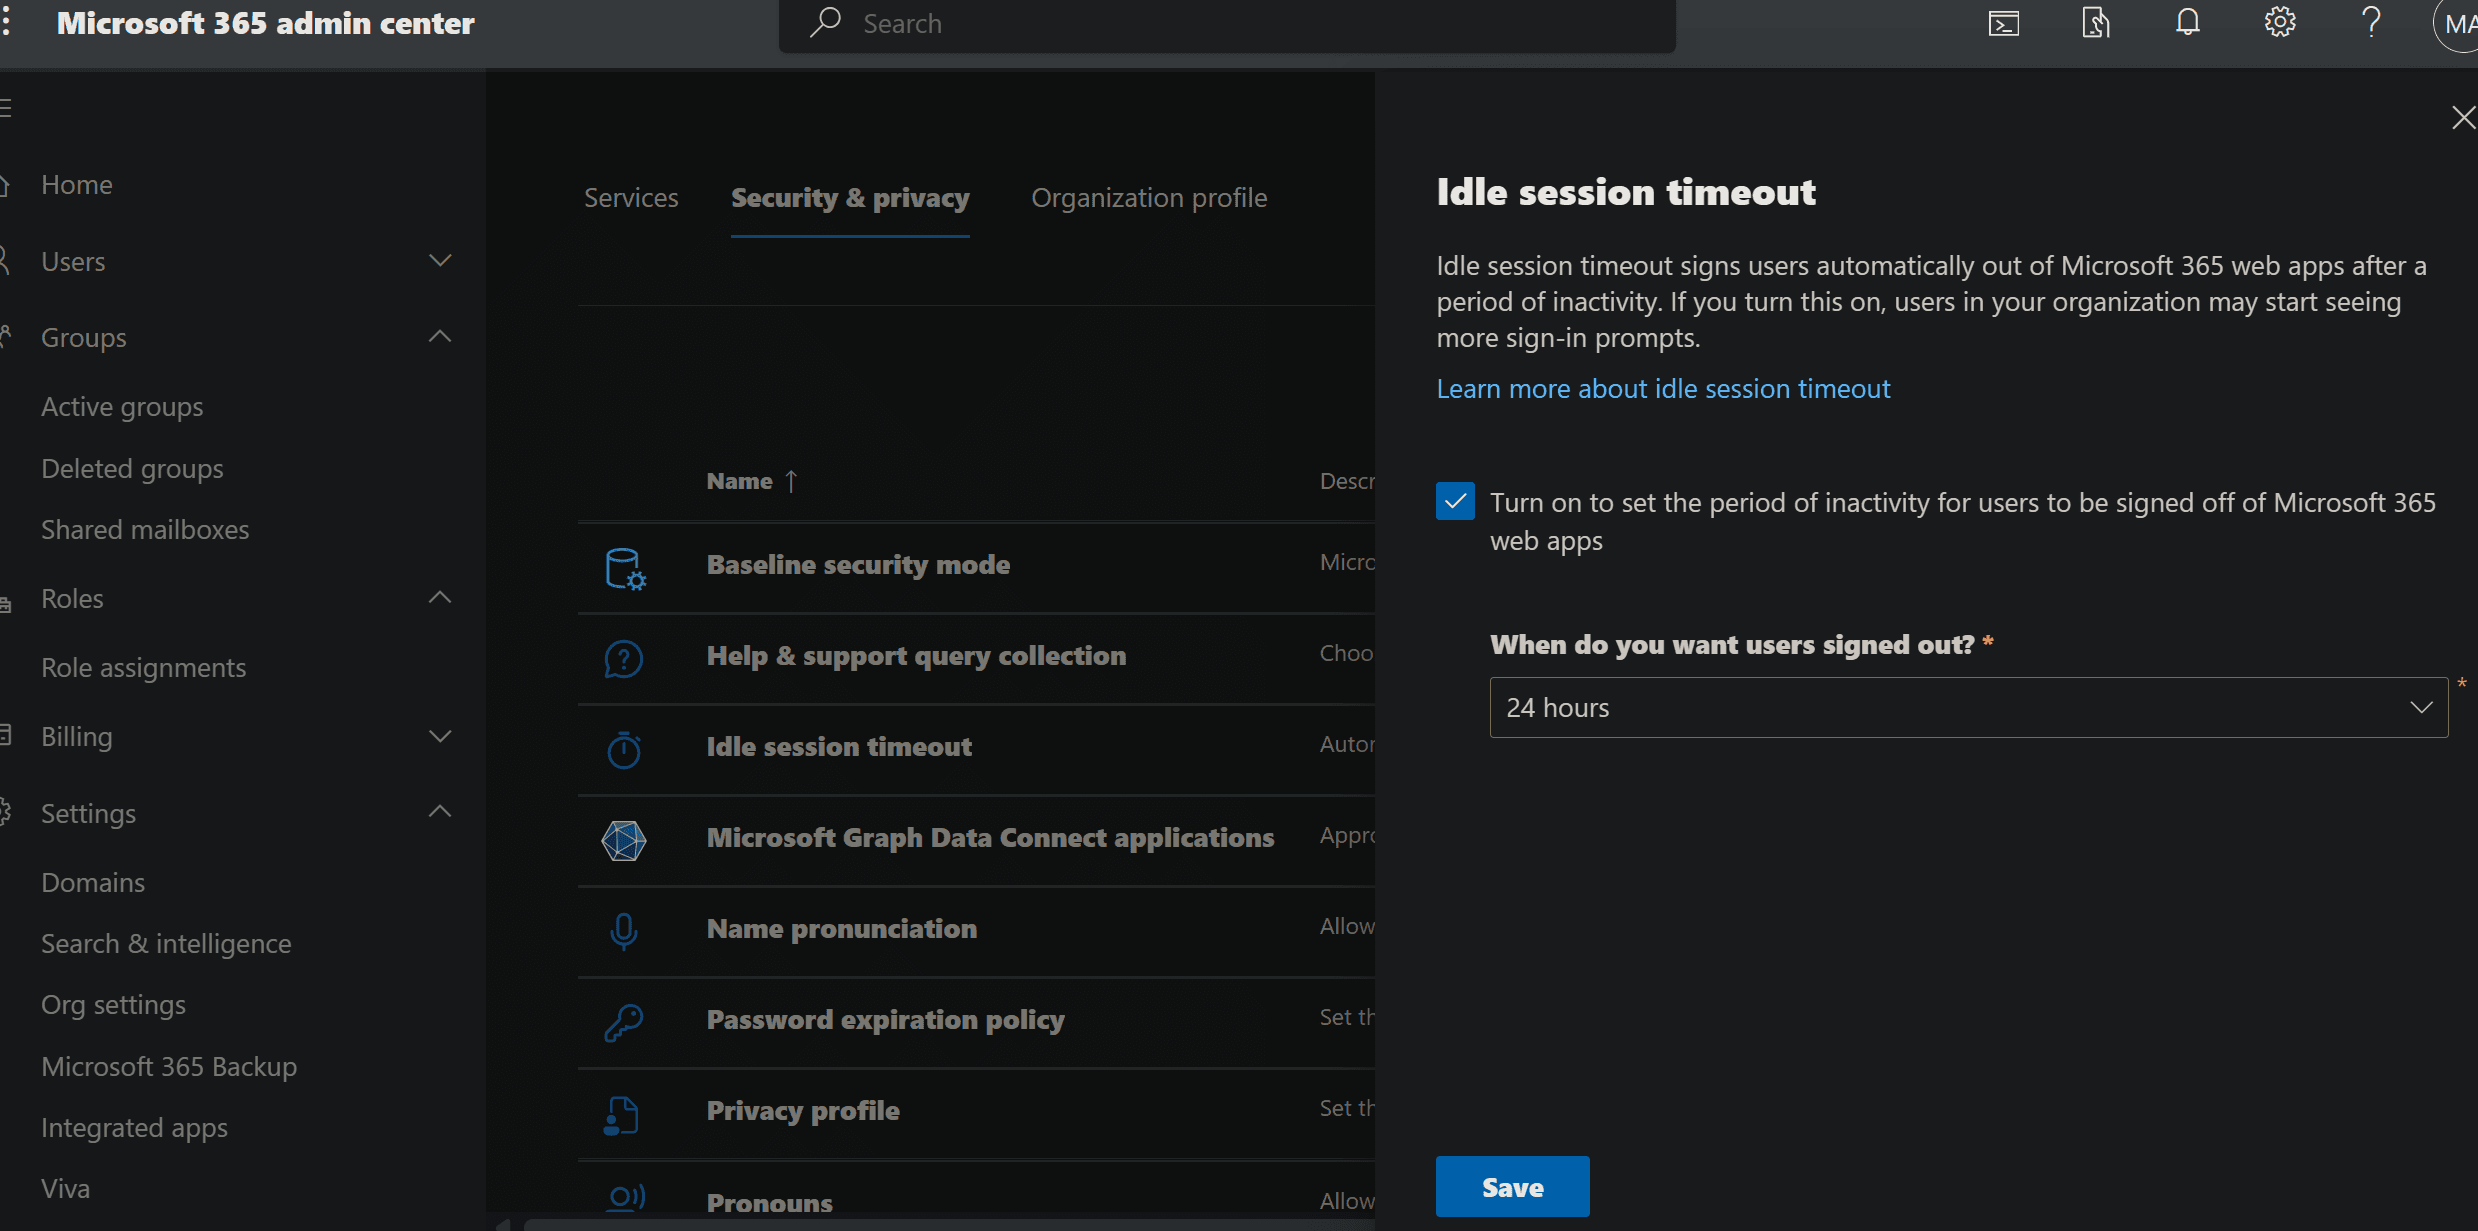
- Navigate to Settings –> Org settings –> Security & privacy.
- Select Idle session timeout.
- Check in the box to set the period of inactivity for users to be signed off from Office web apps.
- Choose a Timeout Value from the dropdown menu.
- Select Save to configure the idle session timeout setting.
Set External Email Tagging
Enable External Email Warning & Tag in Office 365 and Outlook
import-module exchangeonlinemanagement

Connect-ExchangeOnline

# Enable external sender tag and exclude specific senders
Set-ExternalInOutlook `
-Enabled $true `
-AllowList "[email protected]","[email protected]"

Set-ExternalInOutlook -AllowList @{Add="partnerdomain.com","trustedcompany.com"}

# Remove a domain later
Set-ExternalInOutlook -AllowList @{Remove="partnerdomain.com"}
dont use external banner if you want to add HTML banner!!!
HTML banner for external email
Implement External Email Warning Banners in 365 and Gmail
-
Open Exchange Admin Center
https://admin.exchange.microsoft.com -
Go to
Mail flow → Rules -
Click Add a rule (+) → Create a new rule
-
Configure the rule: Name
External Email Warning BannerApply this rule if- The sender is located → Outside the organization
(Optional but recommended)
- The recipient is located → Inside the organization
Do the following
- Select Apply a disclaimer to the message
- Choose Prepend a disclaimer
This places the banner at the top of the email.
-
Click Enter text and paste your HTML banner.
Example HTML banner:
<div style="background:#ffeb9c;
border:1px solid #9C6500;
padding:8px;
font-family:Segoe UI,Arial;
font-size:12px;">
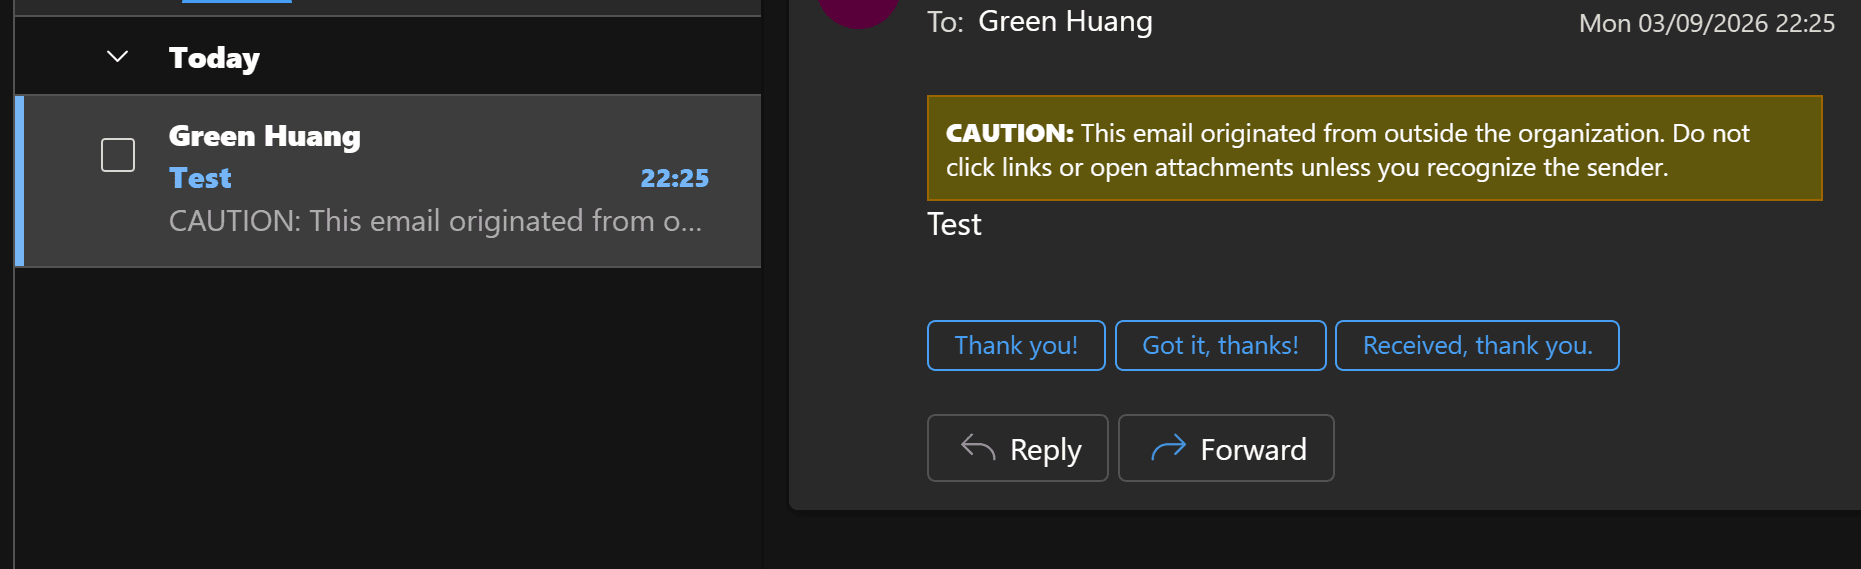
<b>CAUTION:</b> This email originated from outside the organization.
Do not click links or open attachments unless you recognize the sender.
</div>- Set Fallback action
Wrap - (Optional) Add exceptions Except if → Sender address includes
- Click Next → Save
- back to homepage and enable the rule
Exchange will insert the HTML banner into incoming external messages.
block a domain/address in Exchange Online
Microsoft Defender portal -> Email & collaboration → Policies & rules → Threat policies → Tenant Allow/Block List
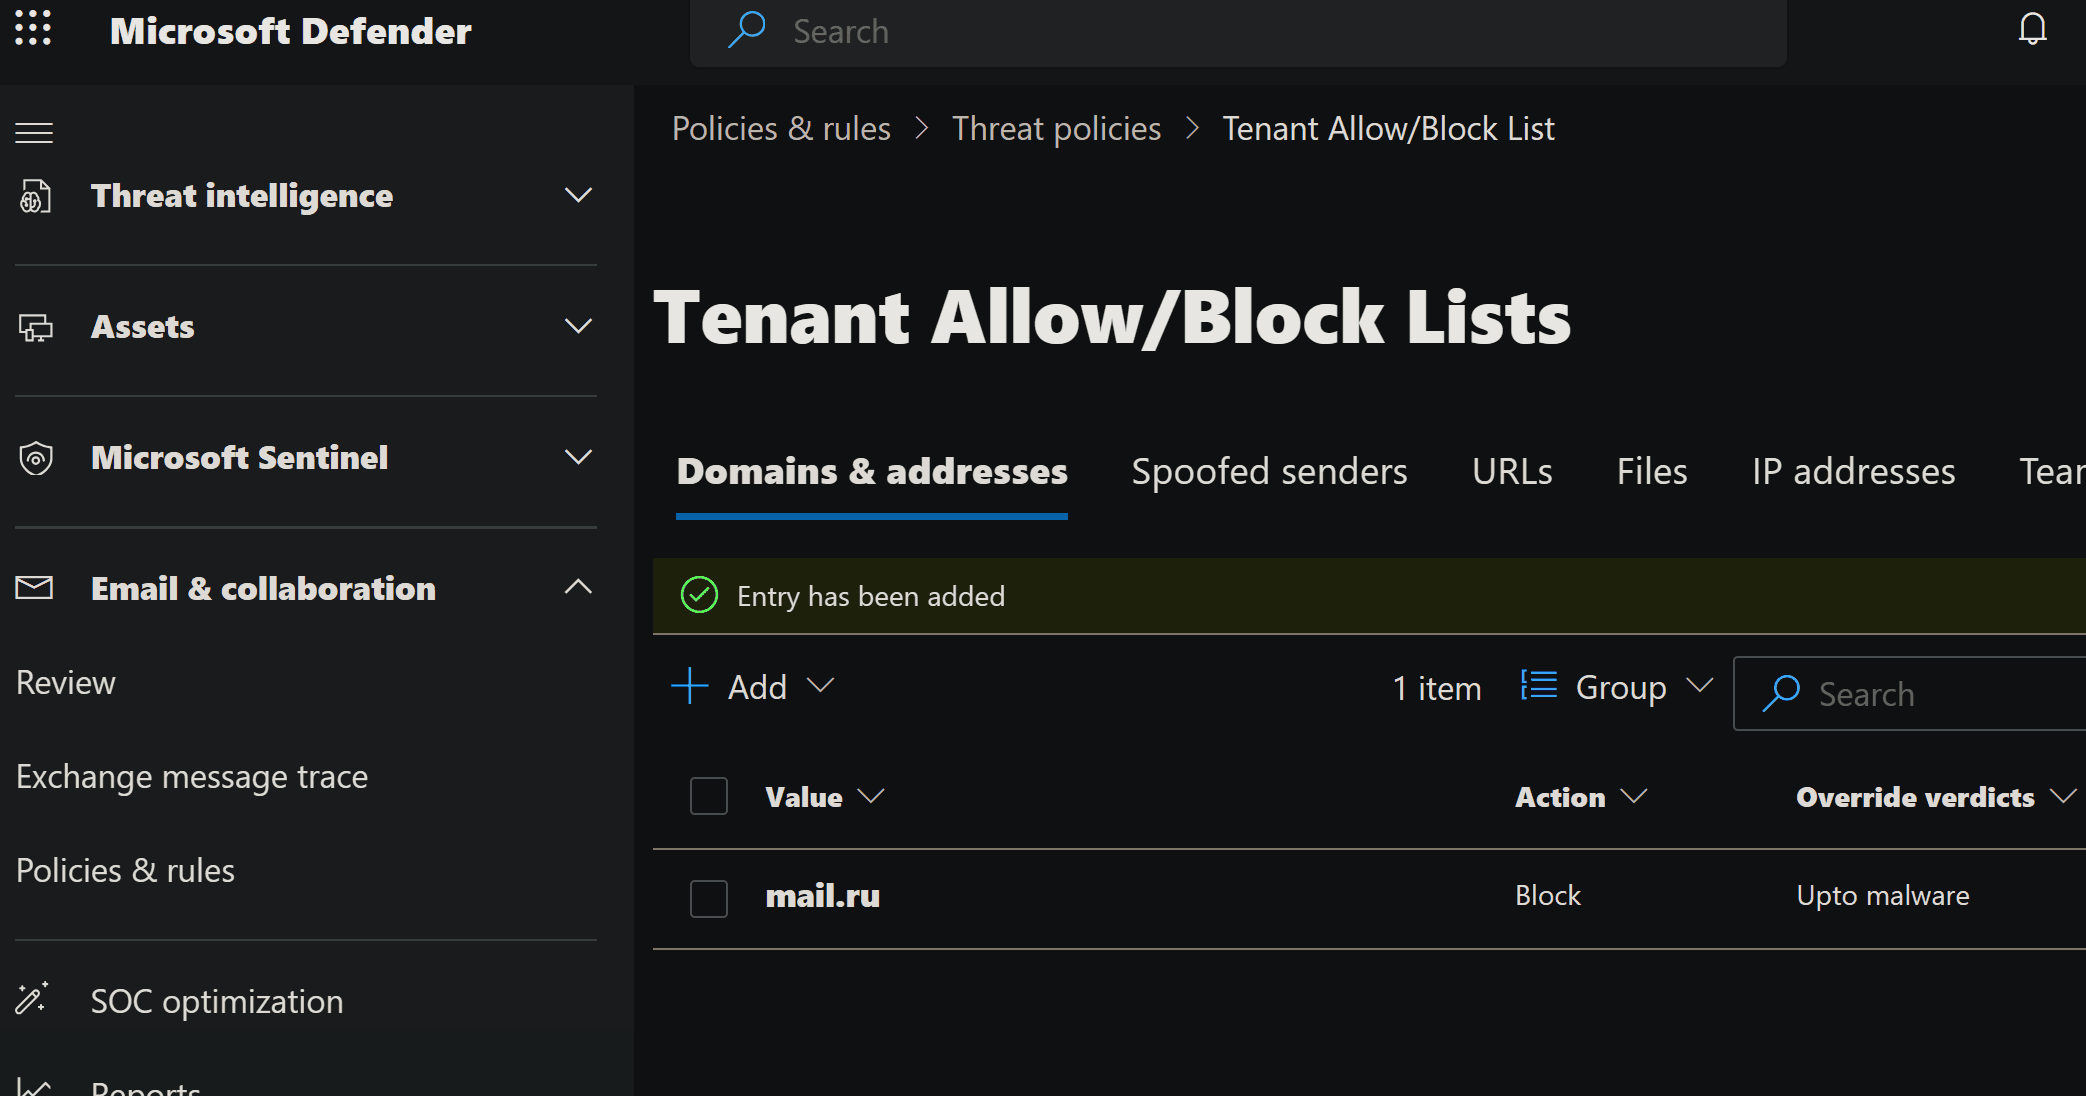
The block applies tenant-wide and can stop both inbound and outbound communication with that domain.
When to use Exchange Mail Flow Rules
Use Exchange → Mail flow → Rules if you need advanced conditions.
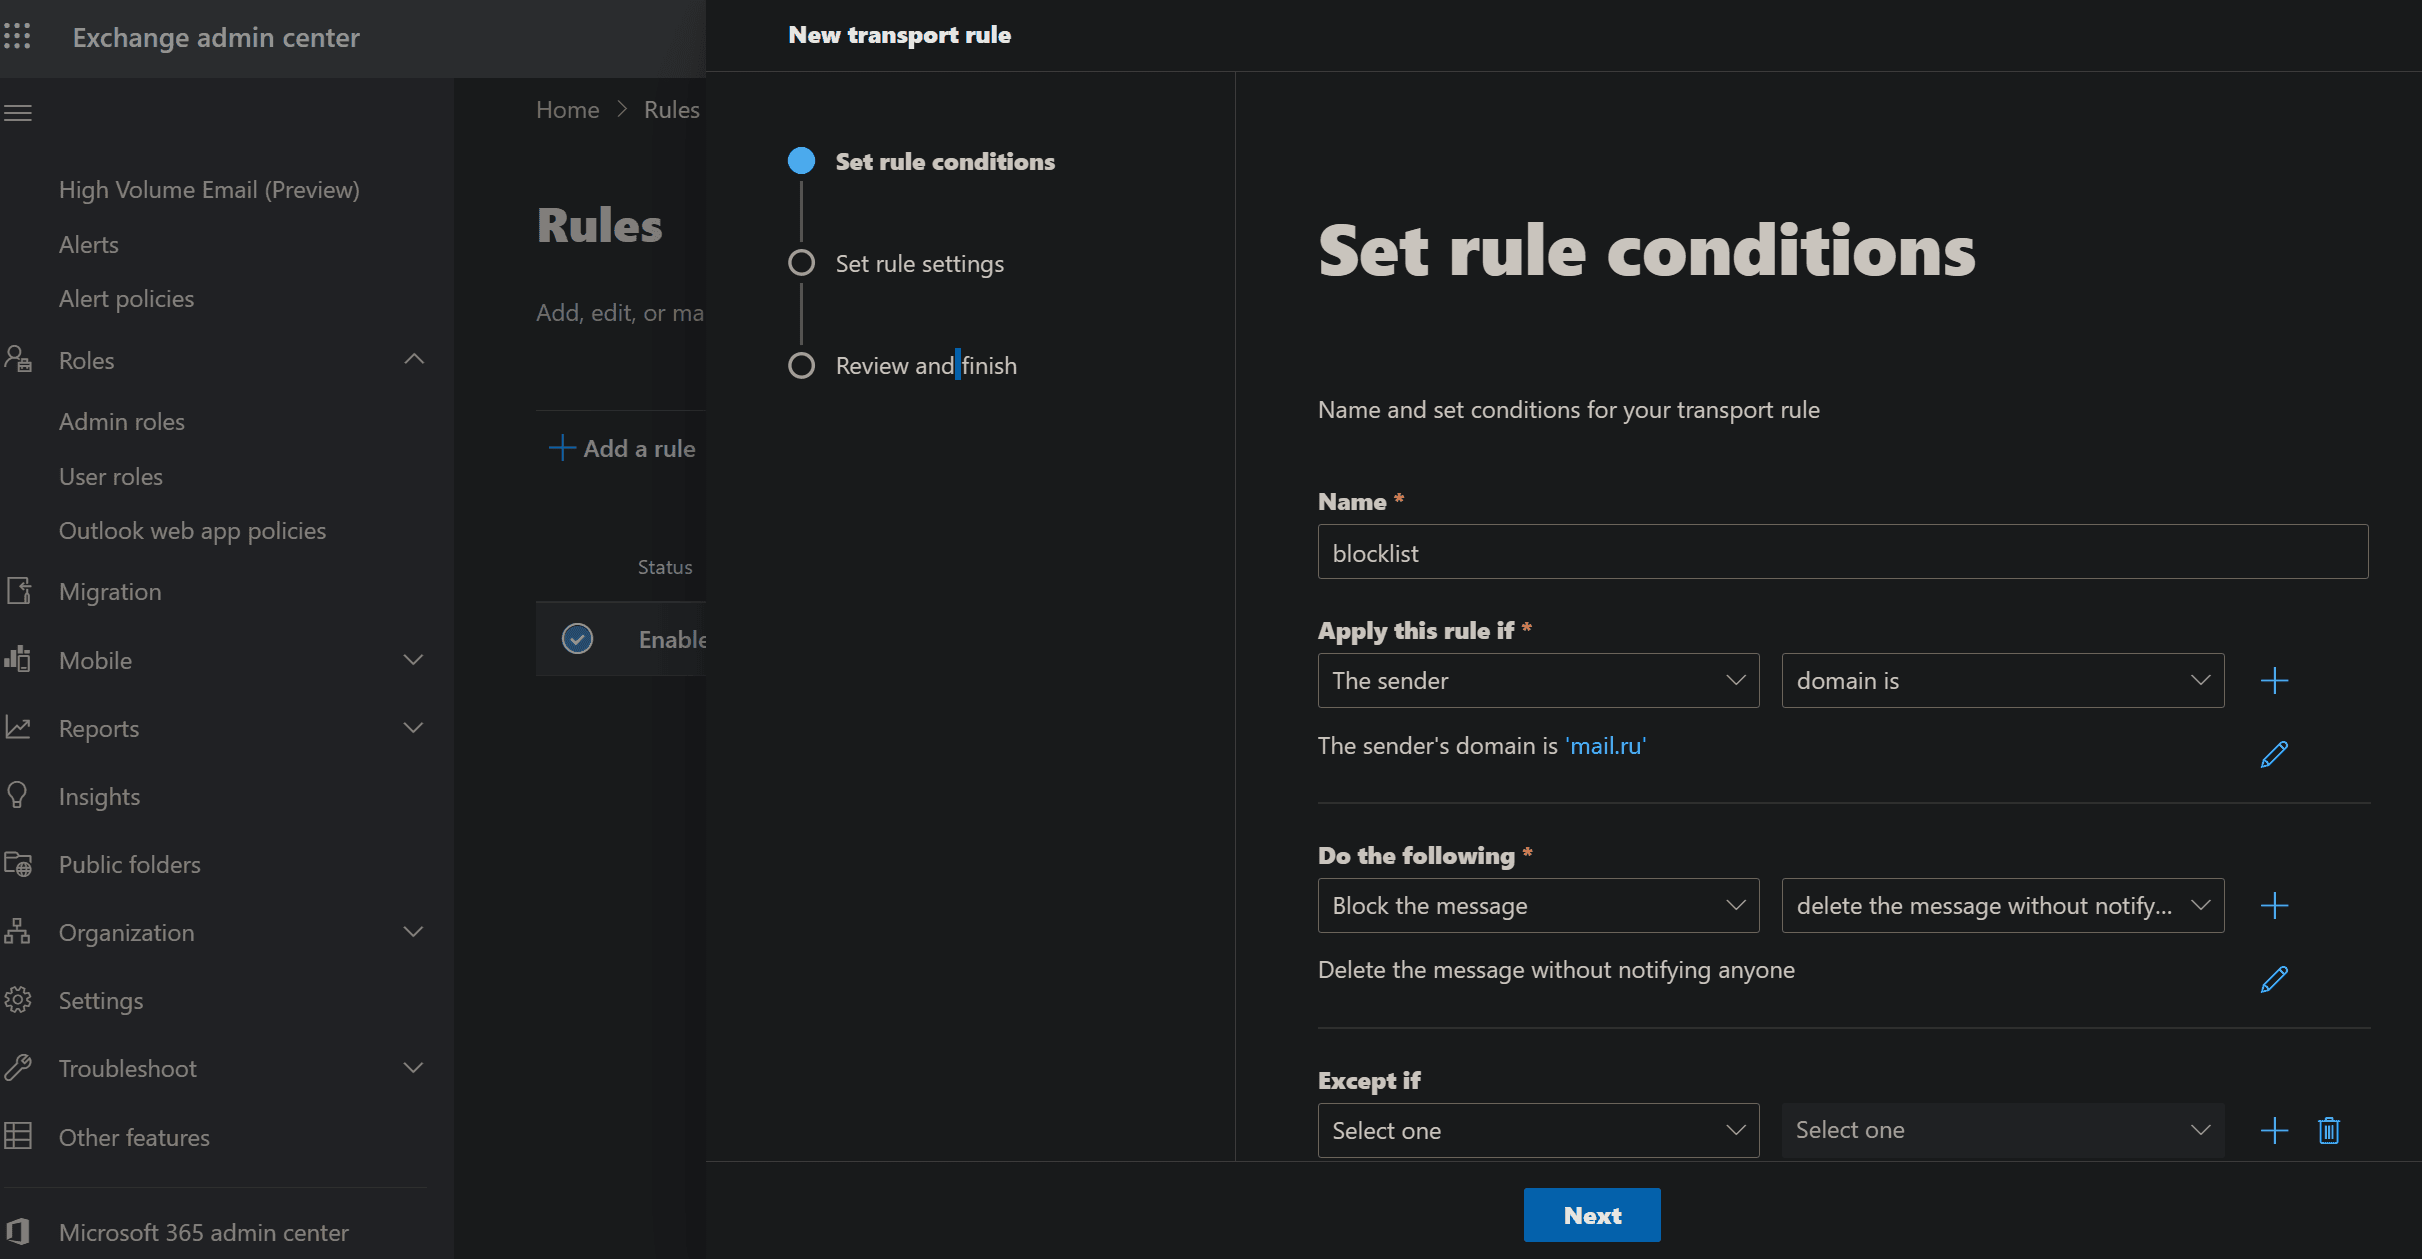
| Scenario | Best location |
|---|---|
| Block a domain globally | Defender (Tenant Allow/Block List) |
| Block a specific sender | Defender |
| Temporary block after phishing | Defender |
| Complex filtering logic | Exchange rule |
| Add banners/warnings | Exchange rule |
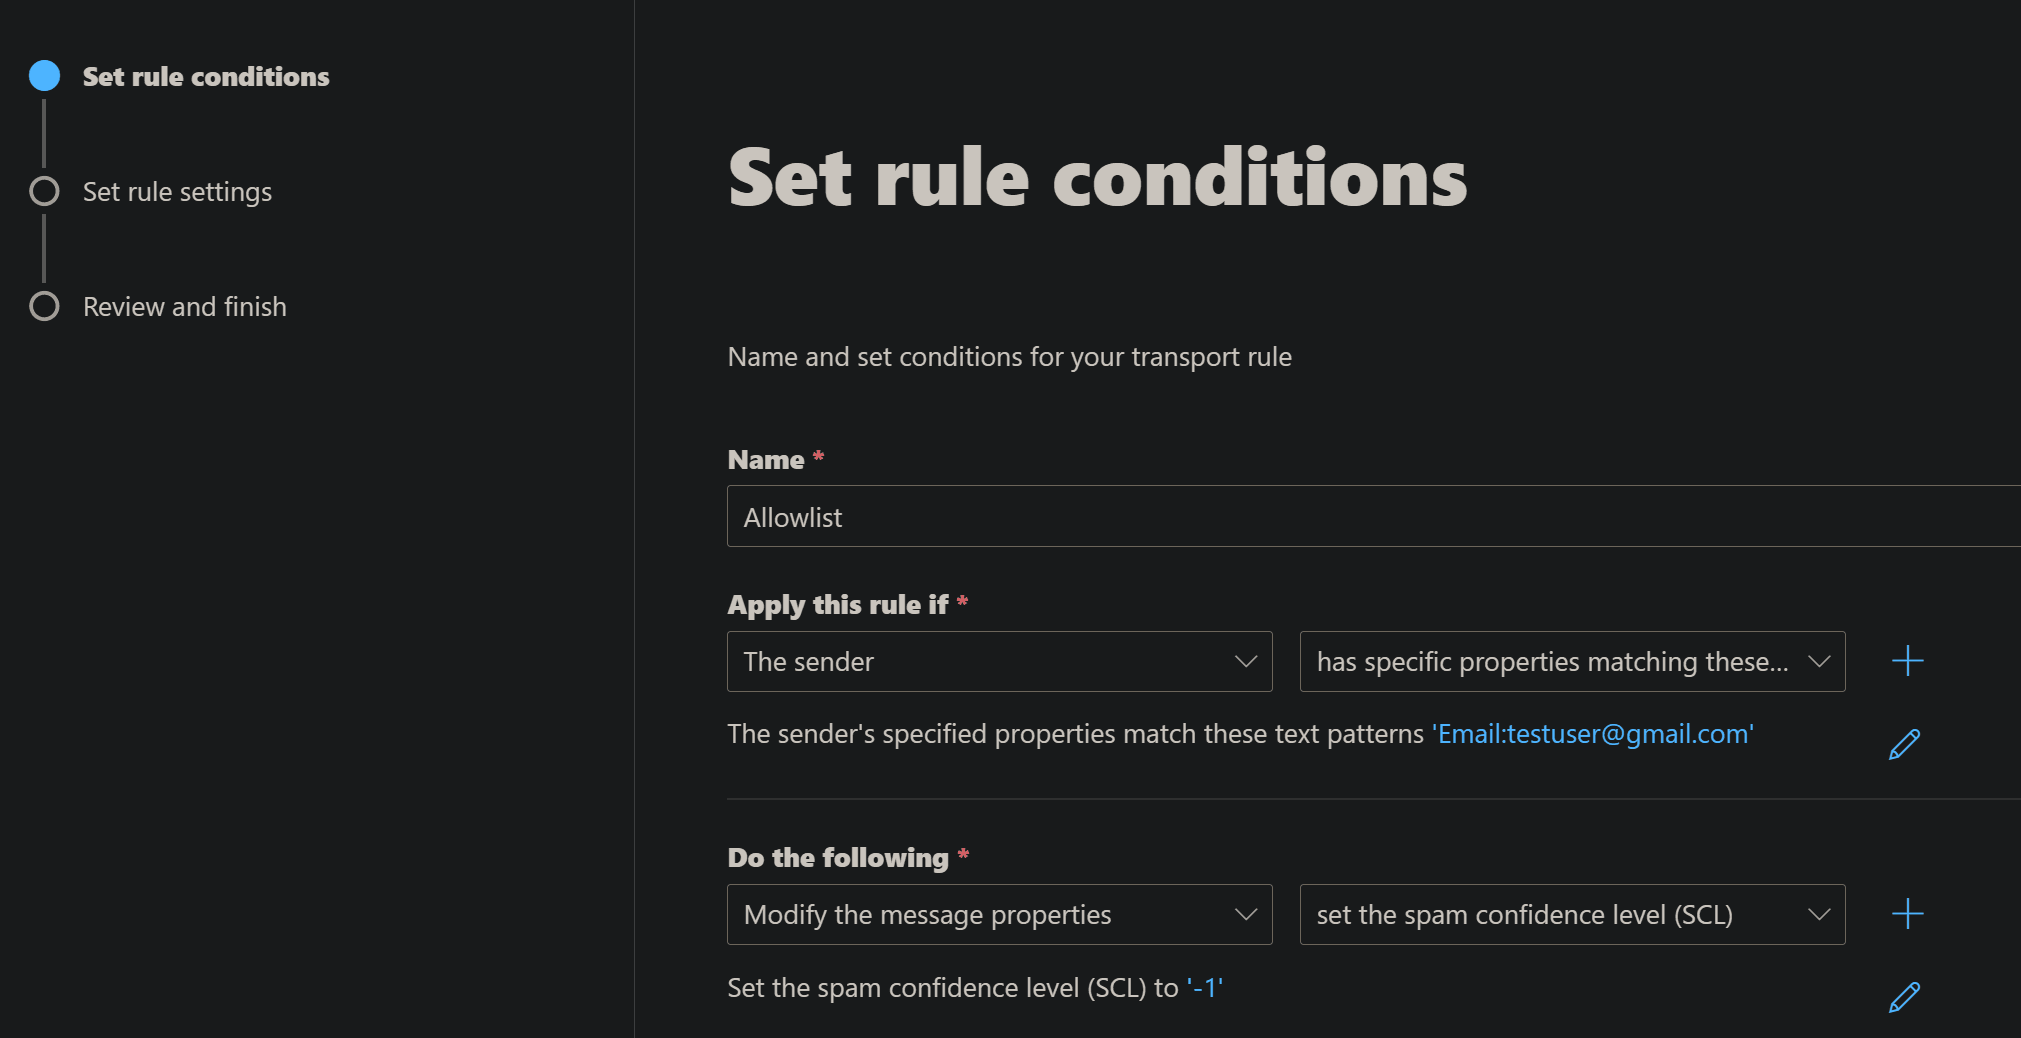
allow Allow sender to bypass rules
Open Exchange Admin Center -> Mail flow → Rules Add rule → Create a new rule -> The sender address includes → [email protected] -> Set the spam confidence level (SCL) to → -1
enable Microsoft 365 audit logs
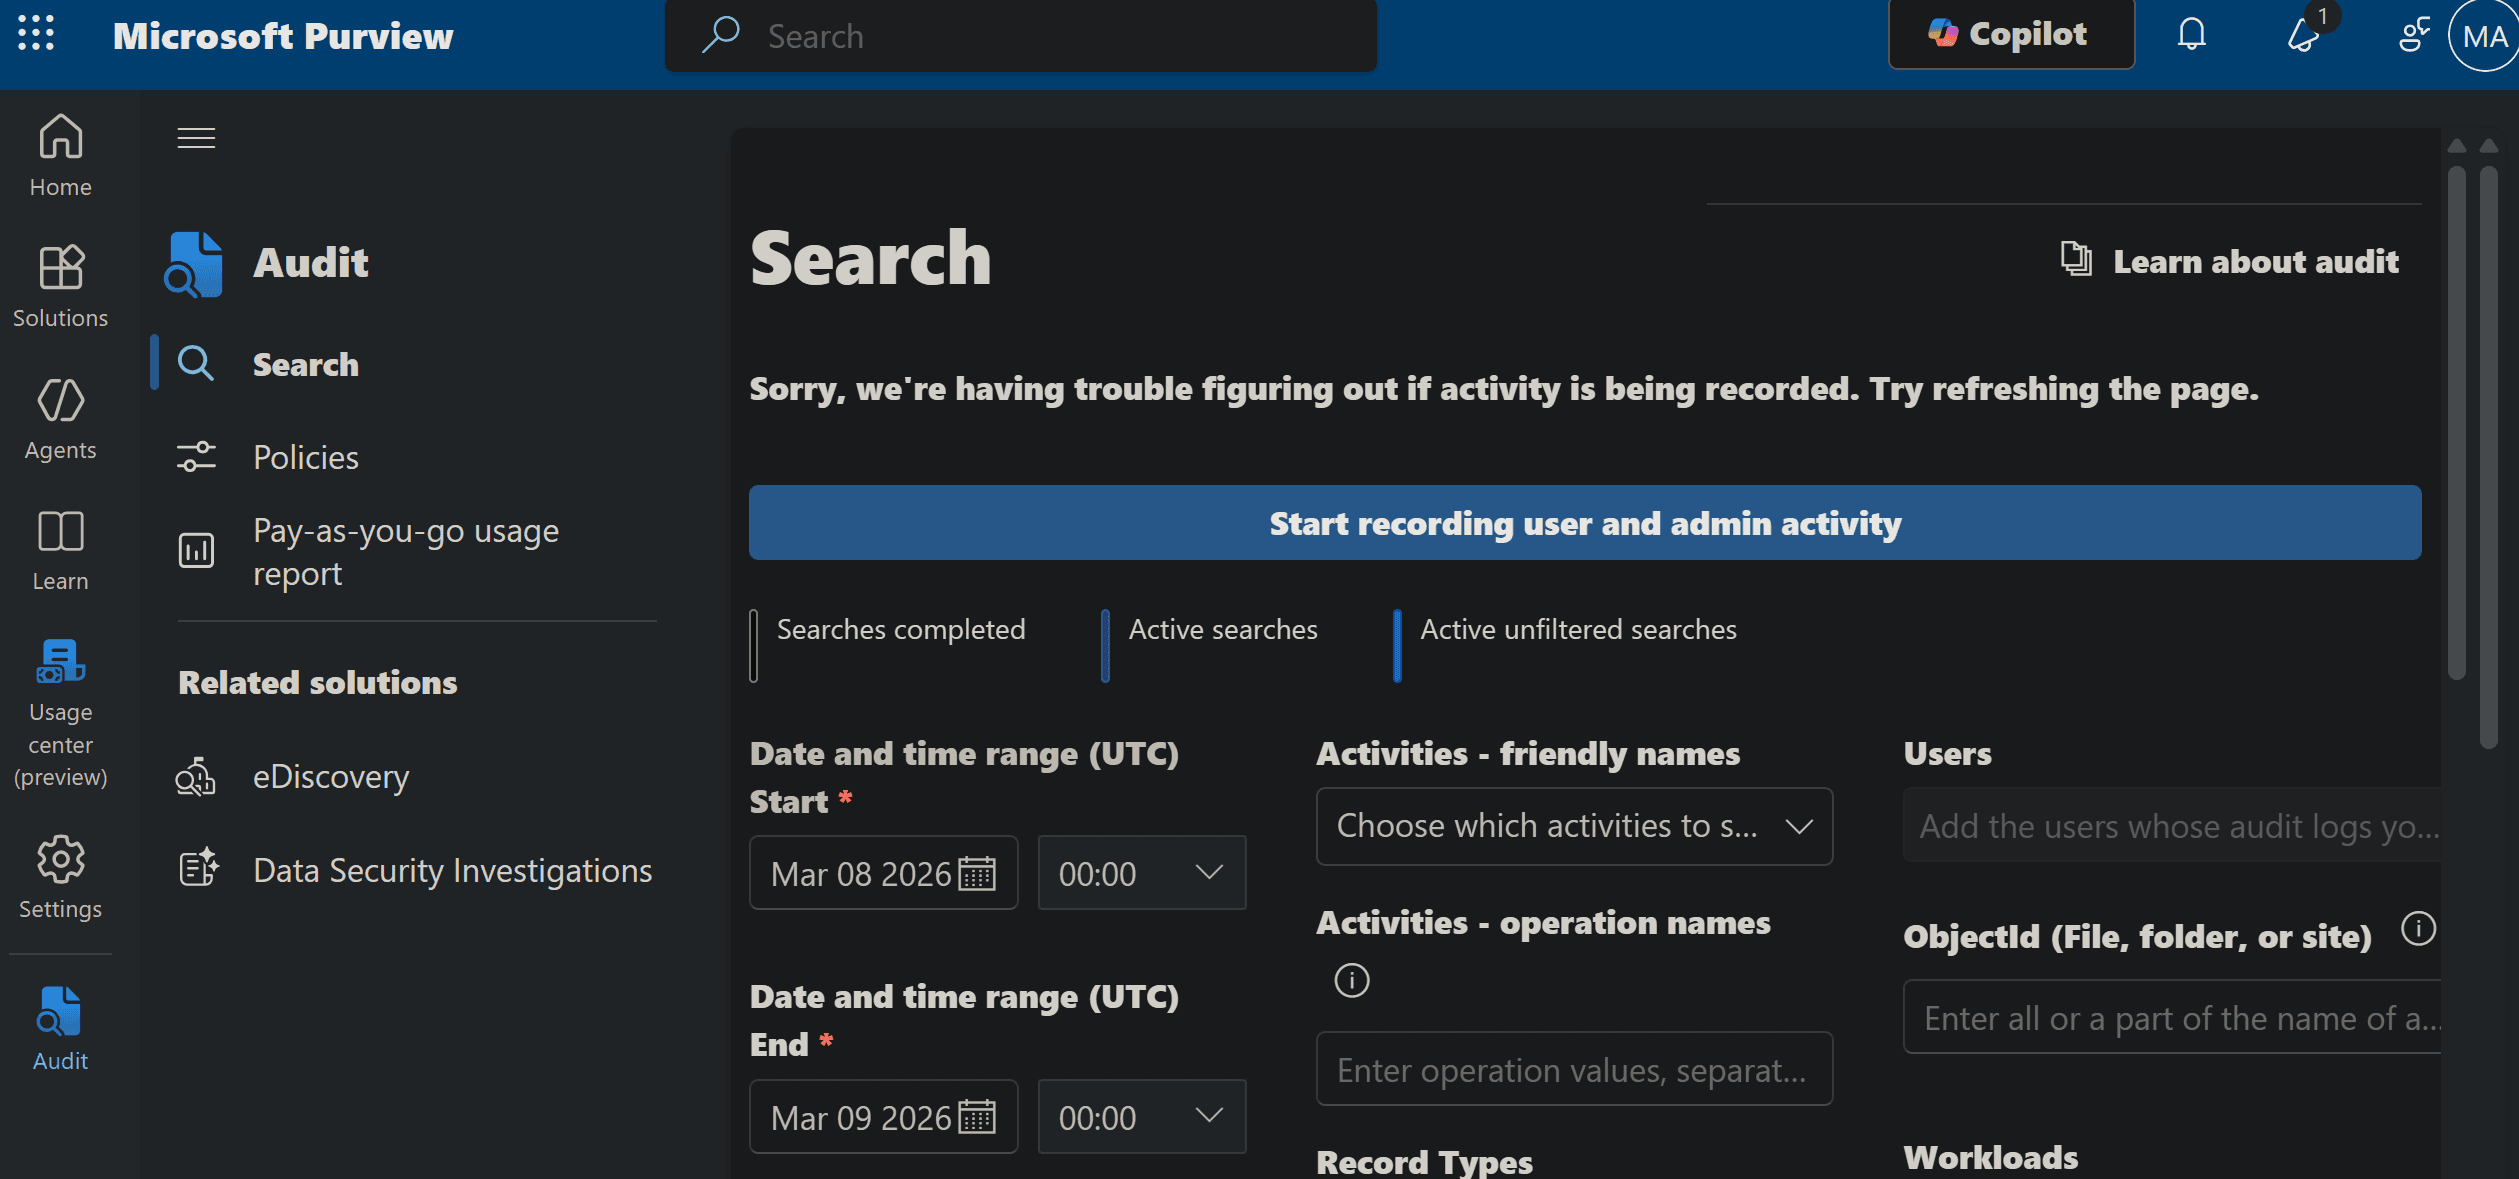
- Go to the Microsoft Purview compliance portal.
- Under the Solutions category, select Audit.
- If auditing is not turned on for your organization, a banner prompting ‘Start recording user and admin activity’ will be displayed in the New Search tab.
- Click on the banner to enable the audit logs.
Create Microsoft 365 Company Branding
Entra Admin Center -> Company Branding -> Default sign-in experience -> Customize
Guide to your organization’s branding in Microsoft 365